How to Tan an Elk Hide
Just before Thanksgiving 2022, I bagged a ~400lb cow elk on the National Elk Refuge in Jackson Hole, WY. More context in the full trip report.
At my Dad's suggestion, I asked my butcher for the hide to get it tanned. After a few days dialing taxidermists, I realized they're very expensive and hard to pin down. All the shops within a few hundred miles didn't tan hides. They only handled mounts.
So, I Googled and YouTubed, growing frustrated by conflicting steps. Each article / tutorial had unique tanning steps, each "critical" to the process. I pieced together the common elements for my best attempt.
I'll break down the steps that worked well – plus links to helpful resources – and take my best guess at the purpose of each step. (Most guides lacked satisfying explanations.)
I kept the fur on my hide. Some steps will change if you're looking to remove hair. I'll link to other articles for hair-off tanning.
Bonus: Check out the full Instagram story for my hunt.
Note: I may get commissions for purchases from certain links in this post.
Summary
Summary of my steps, plus my best guesses at the why's:
- Flesh the hide: Remove remaining flesh and fat.
Flesh and fat will rot / spoil. - Salt: Cover the hide with non-iodized salt to draw out moisture.
Inhibits bacteria growth; some sources claim salt damages the hide (in the minority); others claim it's mandatory to set hair; once salted, hides can be stored for months, maybe years; a hide can also be frozen for some time before salting. - Rehydrate / clean: Quick soak in salt / detergent solution, gently rinsing blood and dirt from the hair.
Once salted, the stiff hide can be difficult to clean; at some point, you'll need to remove dirt / blood. - Drain: Allow the hide to partially dry.
So the hide can absorb pickle solution. - Pickle: Soak the hide in a mildly acidic (pH 2) solution.
Kills bacteria; sets hair by contracting hair follicles; removes non-structural proteins to allow tanning solution to adhere to structural proteins. - Neutralize: Quick soak in a slightly less acidic solution (pH 4-5).
If too acidic, tanning solution can't penetrate. - Rinse and drain: Quick rinse in cool water, then drain.
- Tan: Apply brush-on or soak-in tanning solution. (I used "orange bottle" brush-on solution.)
Alter protein structure to increase durability / prevent decay. - Break: While drying, stretch the hide until fibers turn white.
Prevents the hide from becoming rigid when dry. - Thin: I used a hand sander after the hide dried to create a velvet texture; can also thin with a knife before tanning. (Optional.)
- Condition / waterproof: I applied mink oil to waterproof the hide – created a leather texture. (Optional.)
- Store: The hide should be hung somewhere not too hot or moist, breathable to inhibit mold and inaccessible to mice / insects.
A few helpful YouTube tutorials:
- Advanced Tanning Solutions: How To Tan an Elk.
- McKenzie Taxidermy: Tanning Part 1, Part 2 and Part 3 – for a mount, so not everything's applicable.
I lacked some of the tools / materials in these tutorials, and keeping to a reasonable budget, improvised.
Flesh and salt
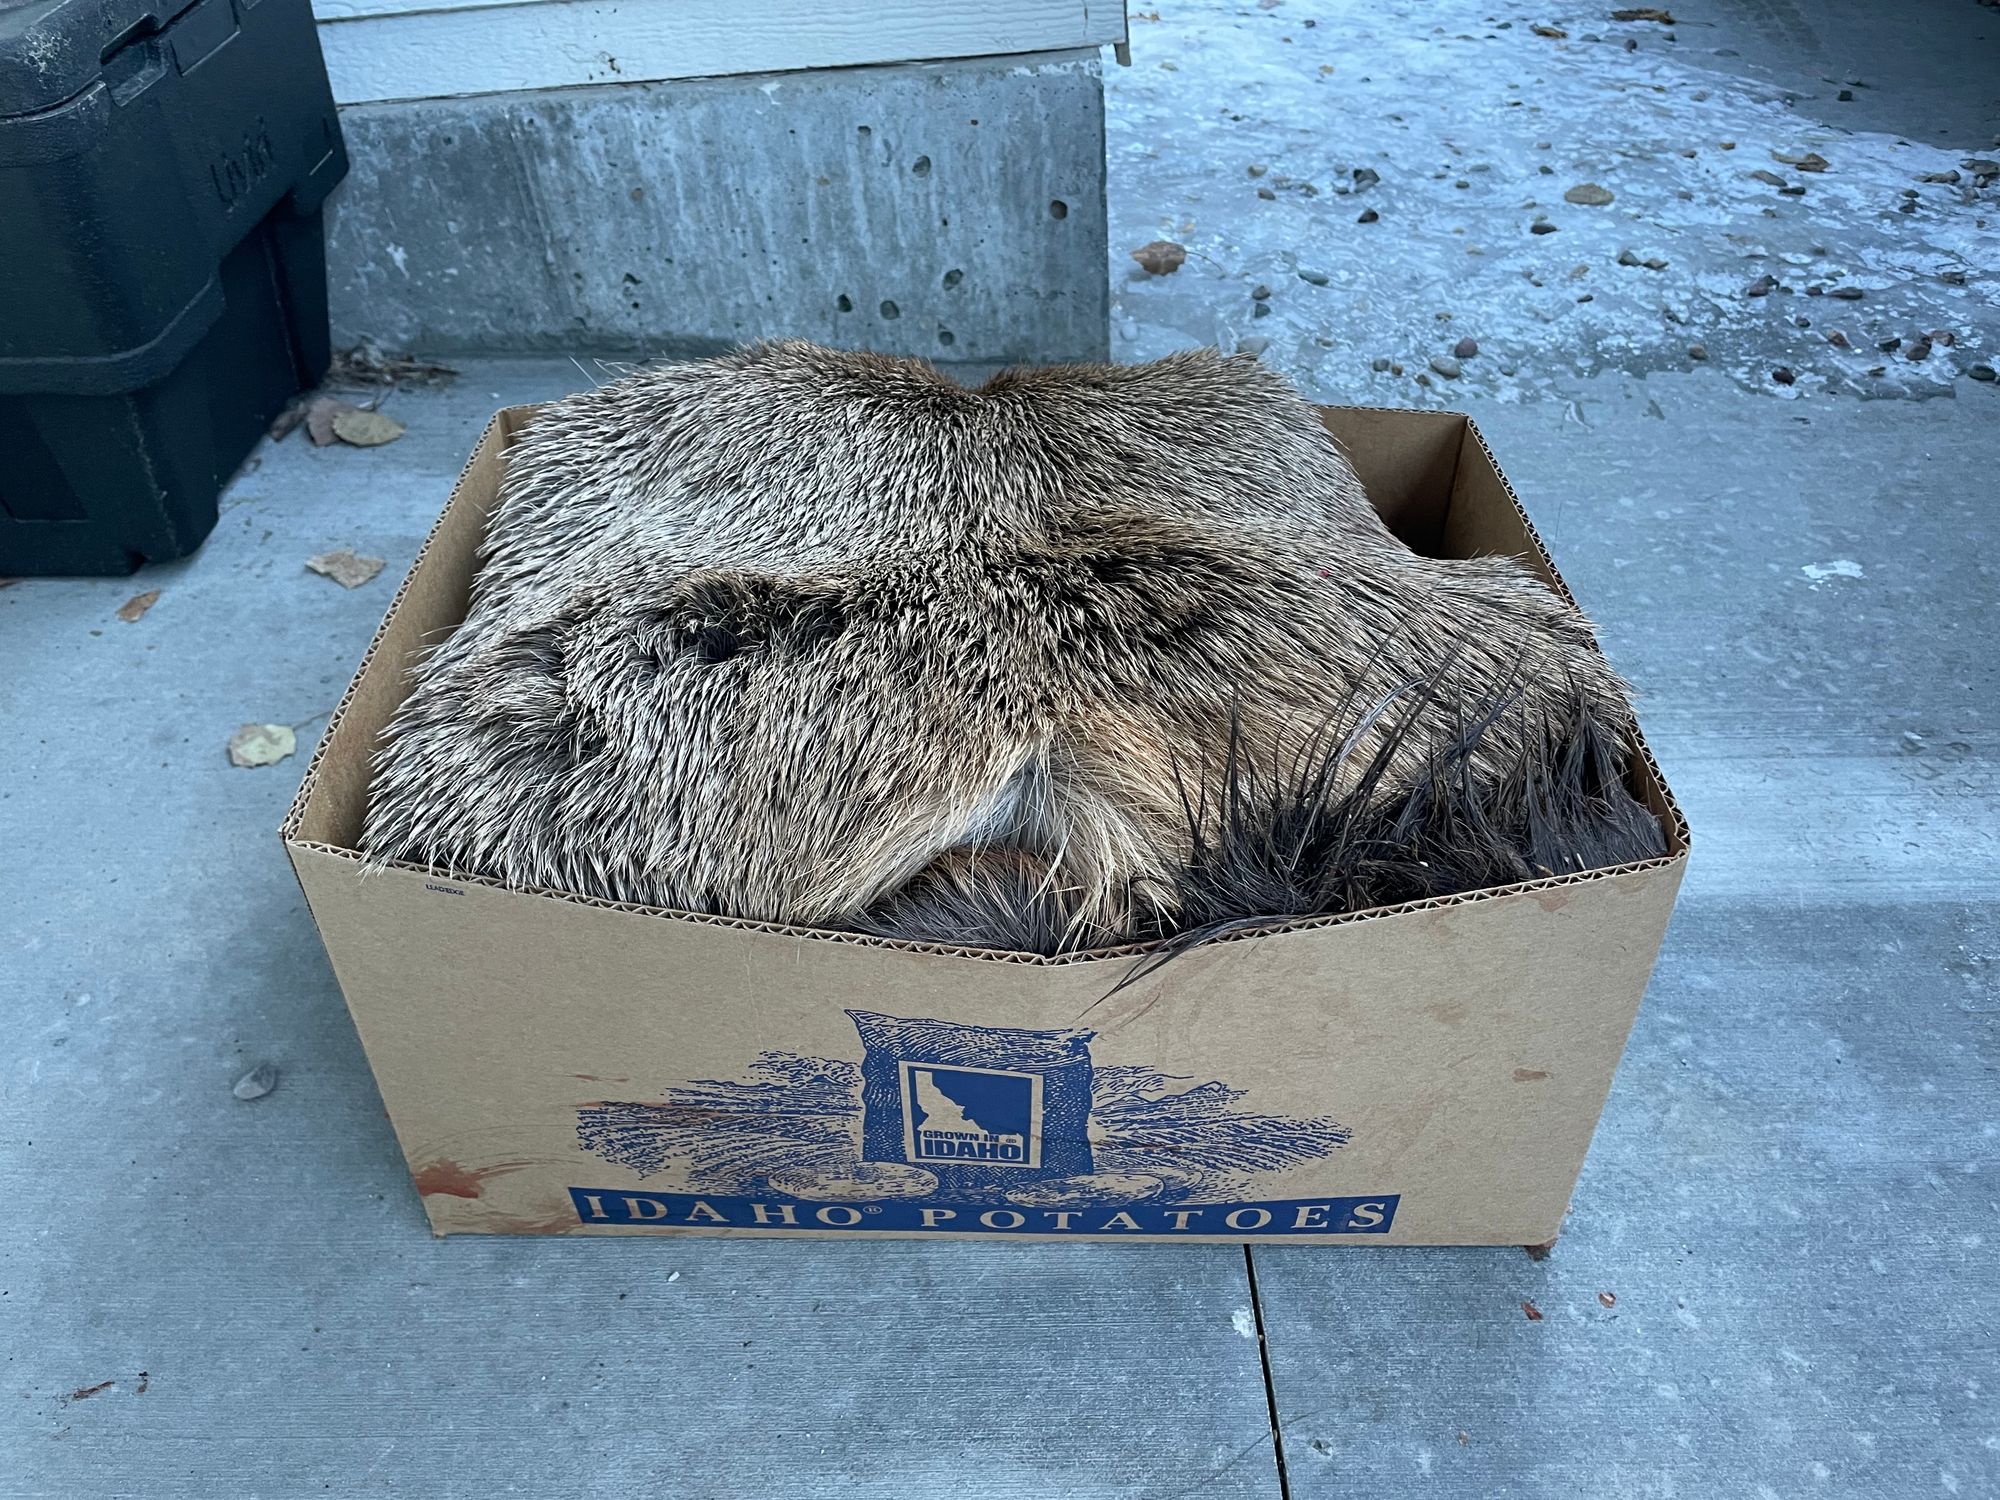
Driving back from my butcher (Matt's Meats in Jackson), I stopped at Smith's for non-iodized salt. The hide was folded in a cardboard box in my truck bed.
At that point, I still planned to send the hide to a taxidermist. From a quick Google search, I realized I needed to flesh and salt the hide immediately.
I found a few guides that caution against salting, claiming it's unneccessary for fresh hides and / or only required for dry storage. For hair-on, those guides seemed to be in the minority. For hair-off, most guides recommend immersing the hide in plain water bath to loosen fur before shaving. (E.g., the "orange bottle" tanning solution instructions.)
In general, the best results seem to be fresh hides. But if time pressed, a hide can be safely stored in a freezer or once salted. Caution: some tanneries don't accept frozen hides, claiming freezer burn alters the chemistry and tanning process. (E.g., The Tannery.)
For storage, the safest bet seems to be "wet salting." Lay the hide flat, cover with salt, let sit overnight, then roll and store in a bucket. Fluids will drain from the hide, so place a brick beneath it to prevent the hide from soaking. Periodically drain the bucket over the first few days and store up to a year.
Materials:
- Sharp knife and pliers for fleshing
- Fine-grain, non-iodized salt (I used ~6lbs for a medium cow elk)
- Tarp (6x8' did the trick for my hide)
- A clean, dry work area between 40-70F and free from critters / pets
High temperatures / humidity accelerate bacteria growth, while temperatures too low inhibit drying (not to mention are miserable for working); a heated garage in the winter was perfect
My process:
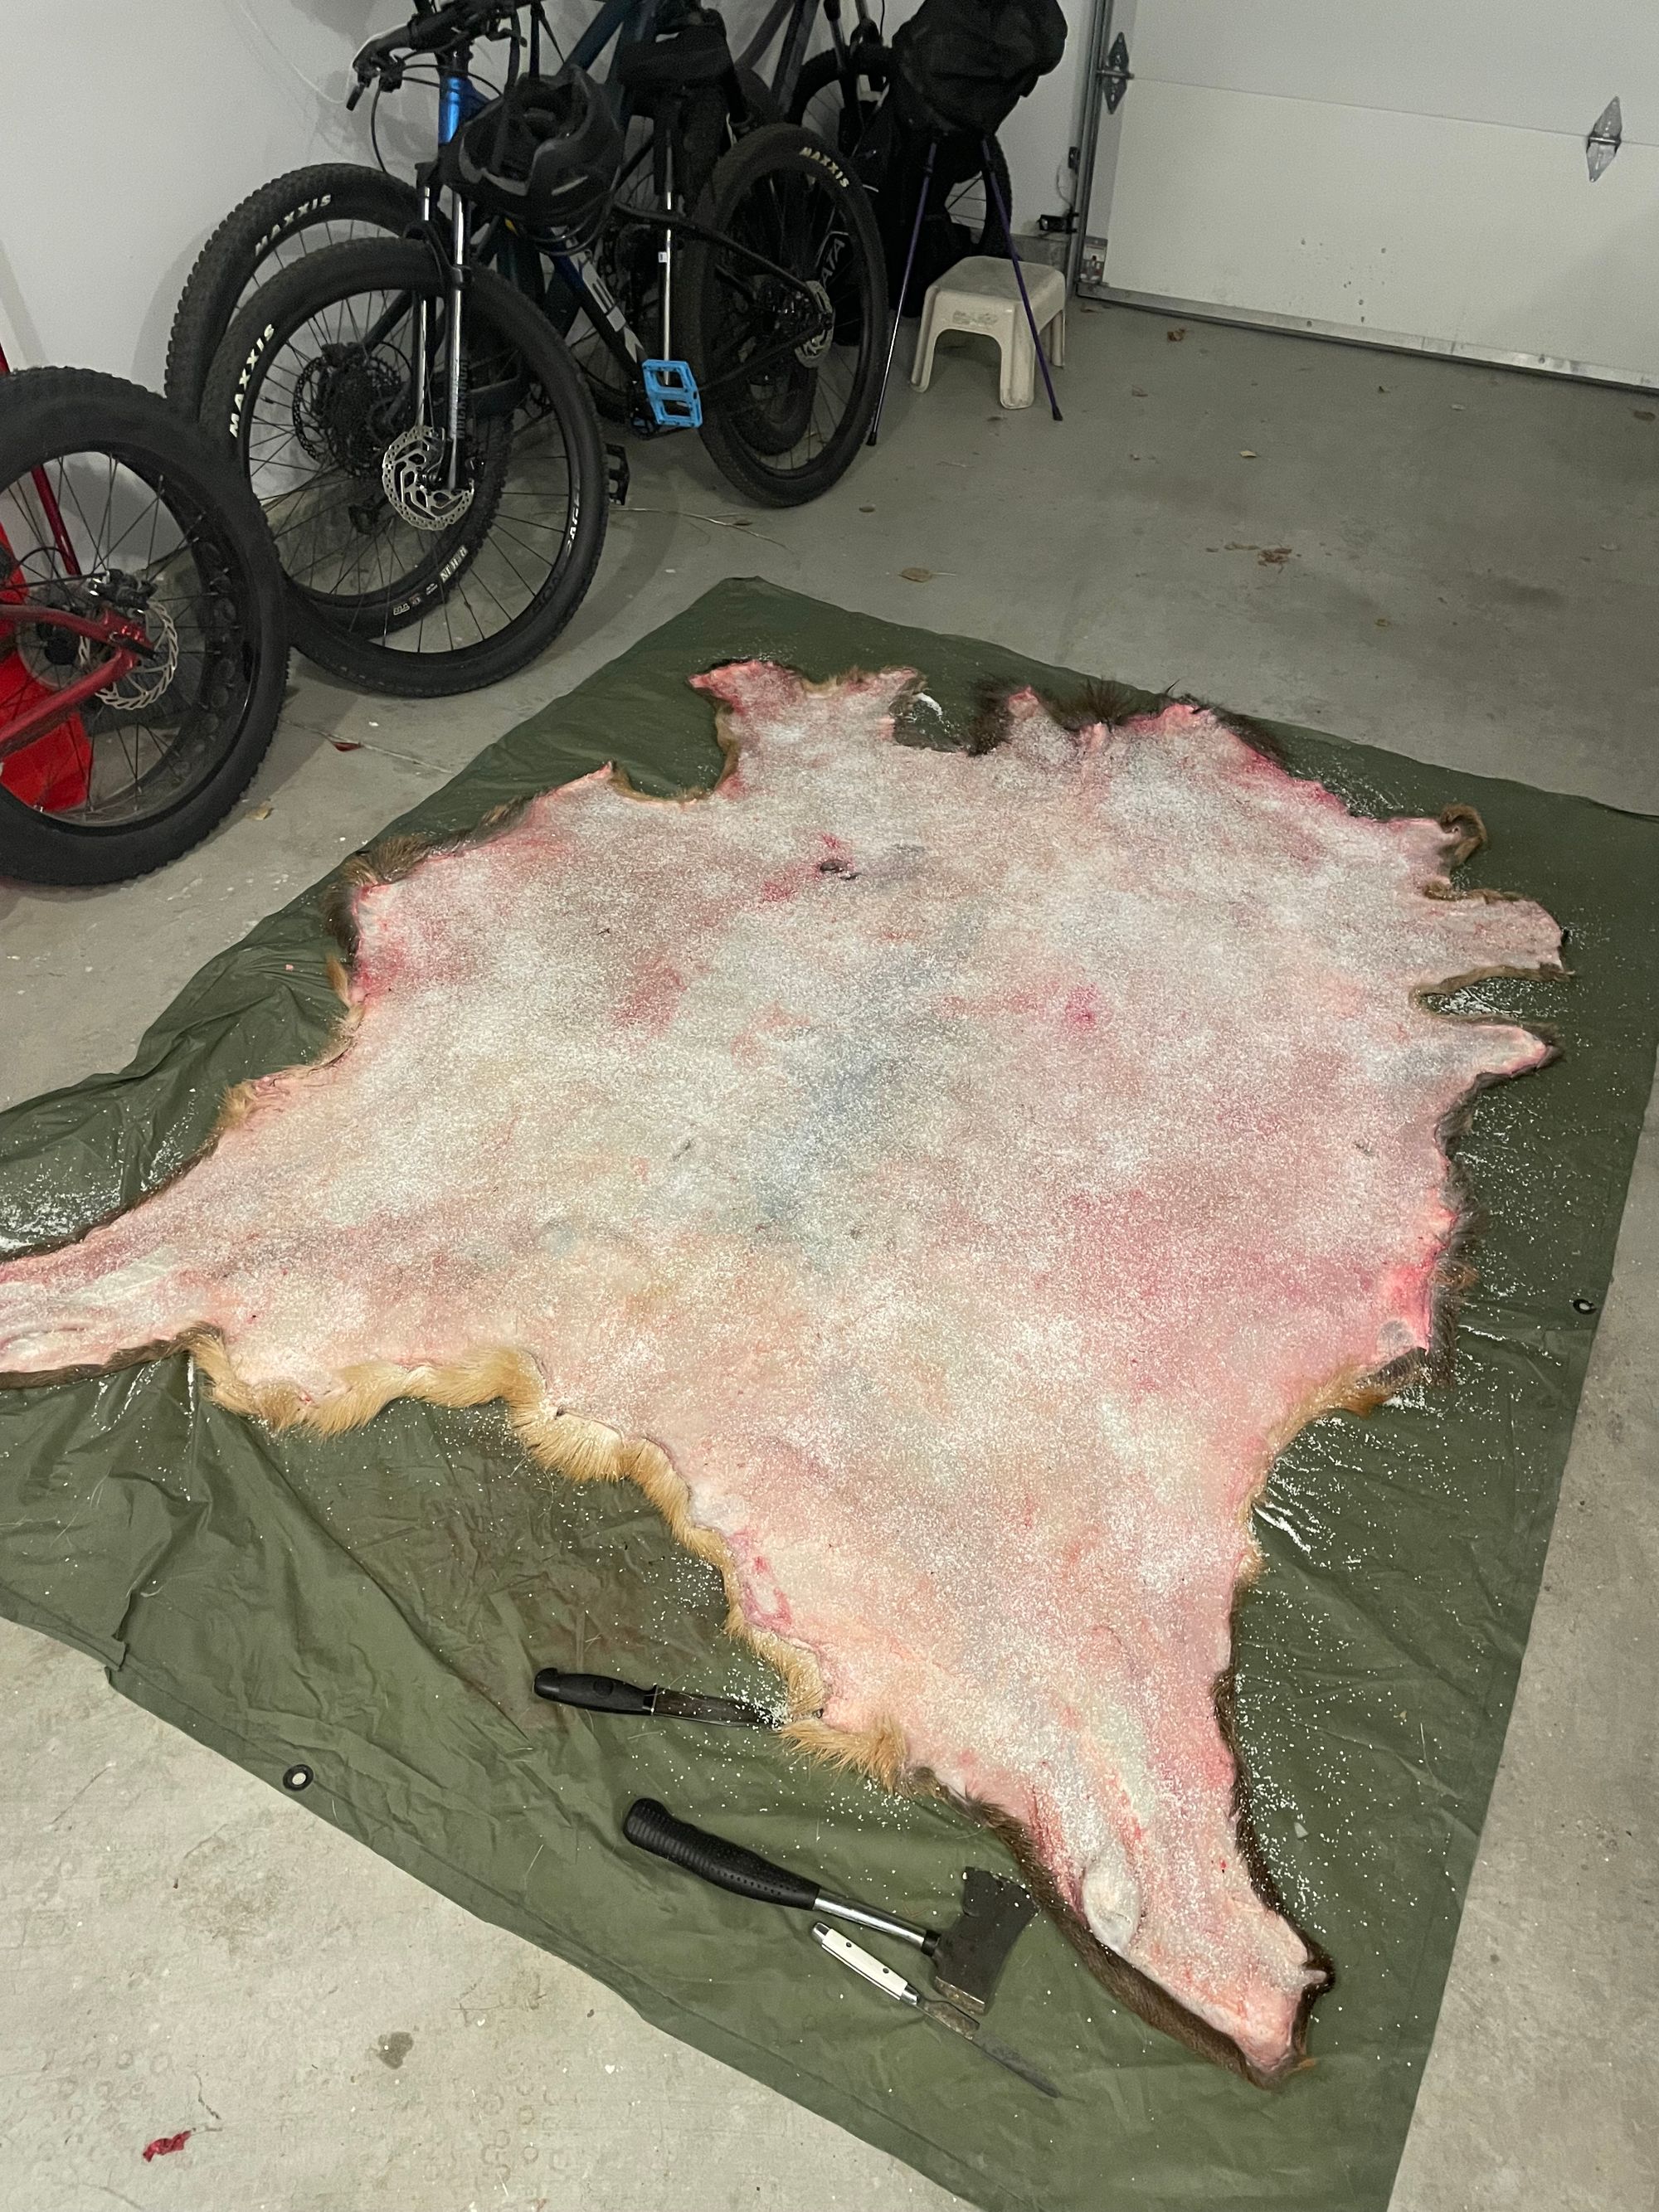
Fleshing (5 hours). Using my hunting knife, I cut away as much flesh and fat as possible. The butchers produced a pretty clean hide. But it's almost impossible to remove all the flesh when skinning. The technique that worked best was pulling flesh / fat with one hand for tension and cutting with the other.
My "pulling hand" cramped after a few hours, at which point I tried pliers. I also experimented with a hatchet and butter knife – the sharp knife worked best.
Fleshing is a slow process. Despite warnings, I never cut through the hide. For a thinner hide – like deer – it makes sense to be more careful.
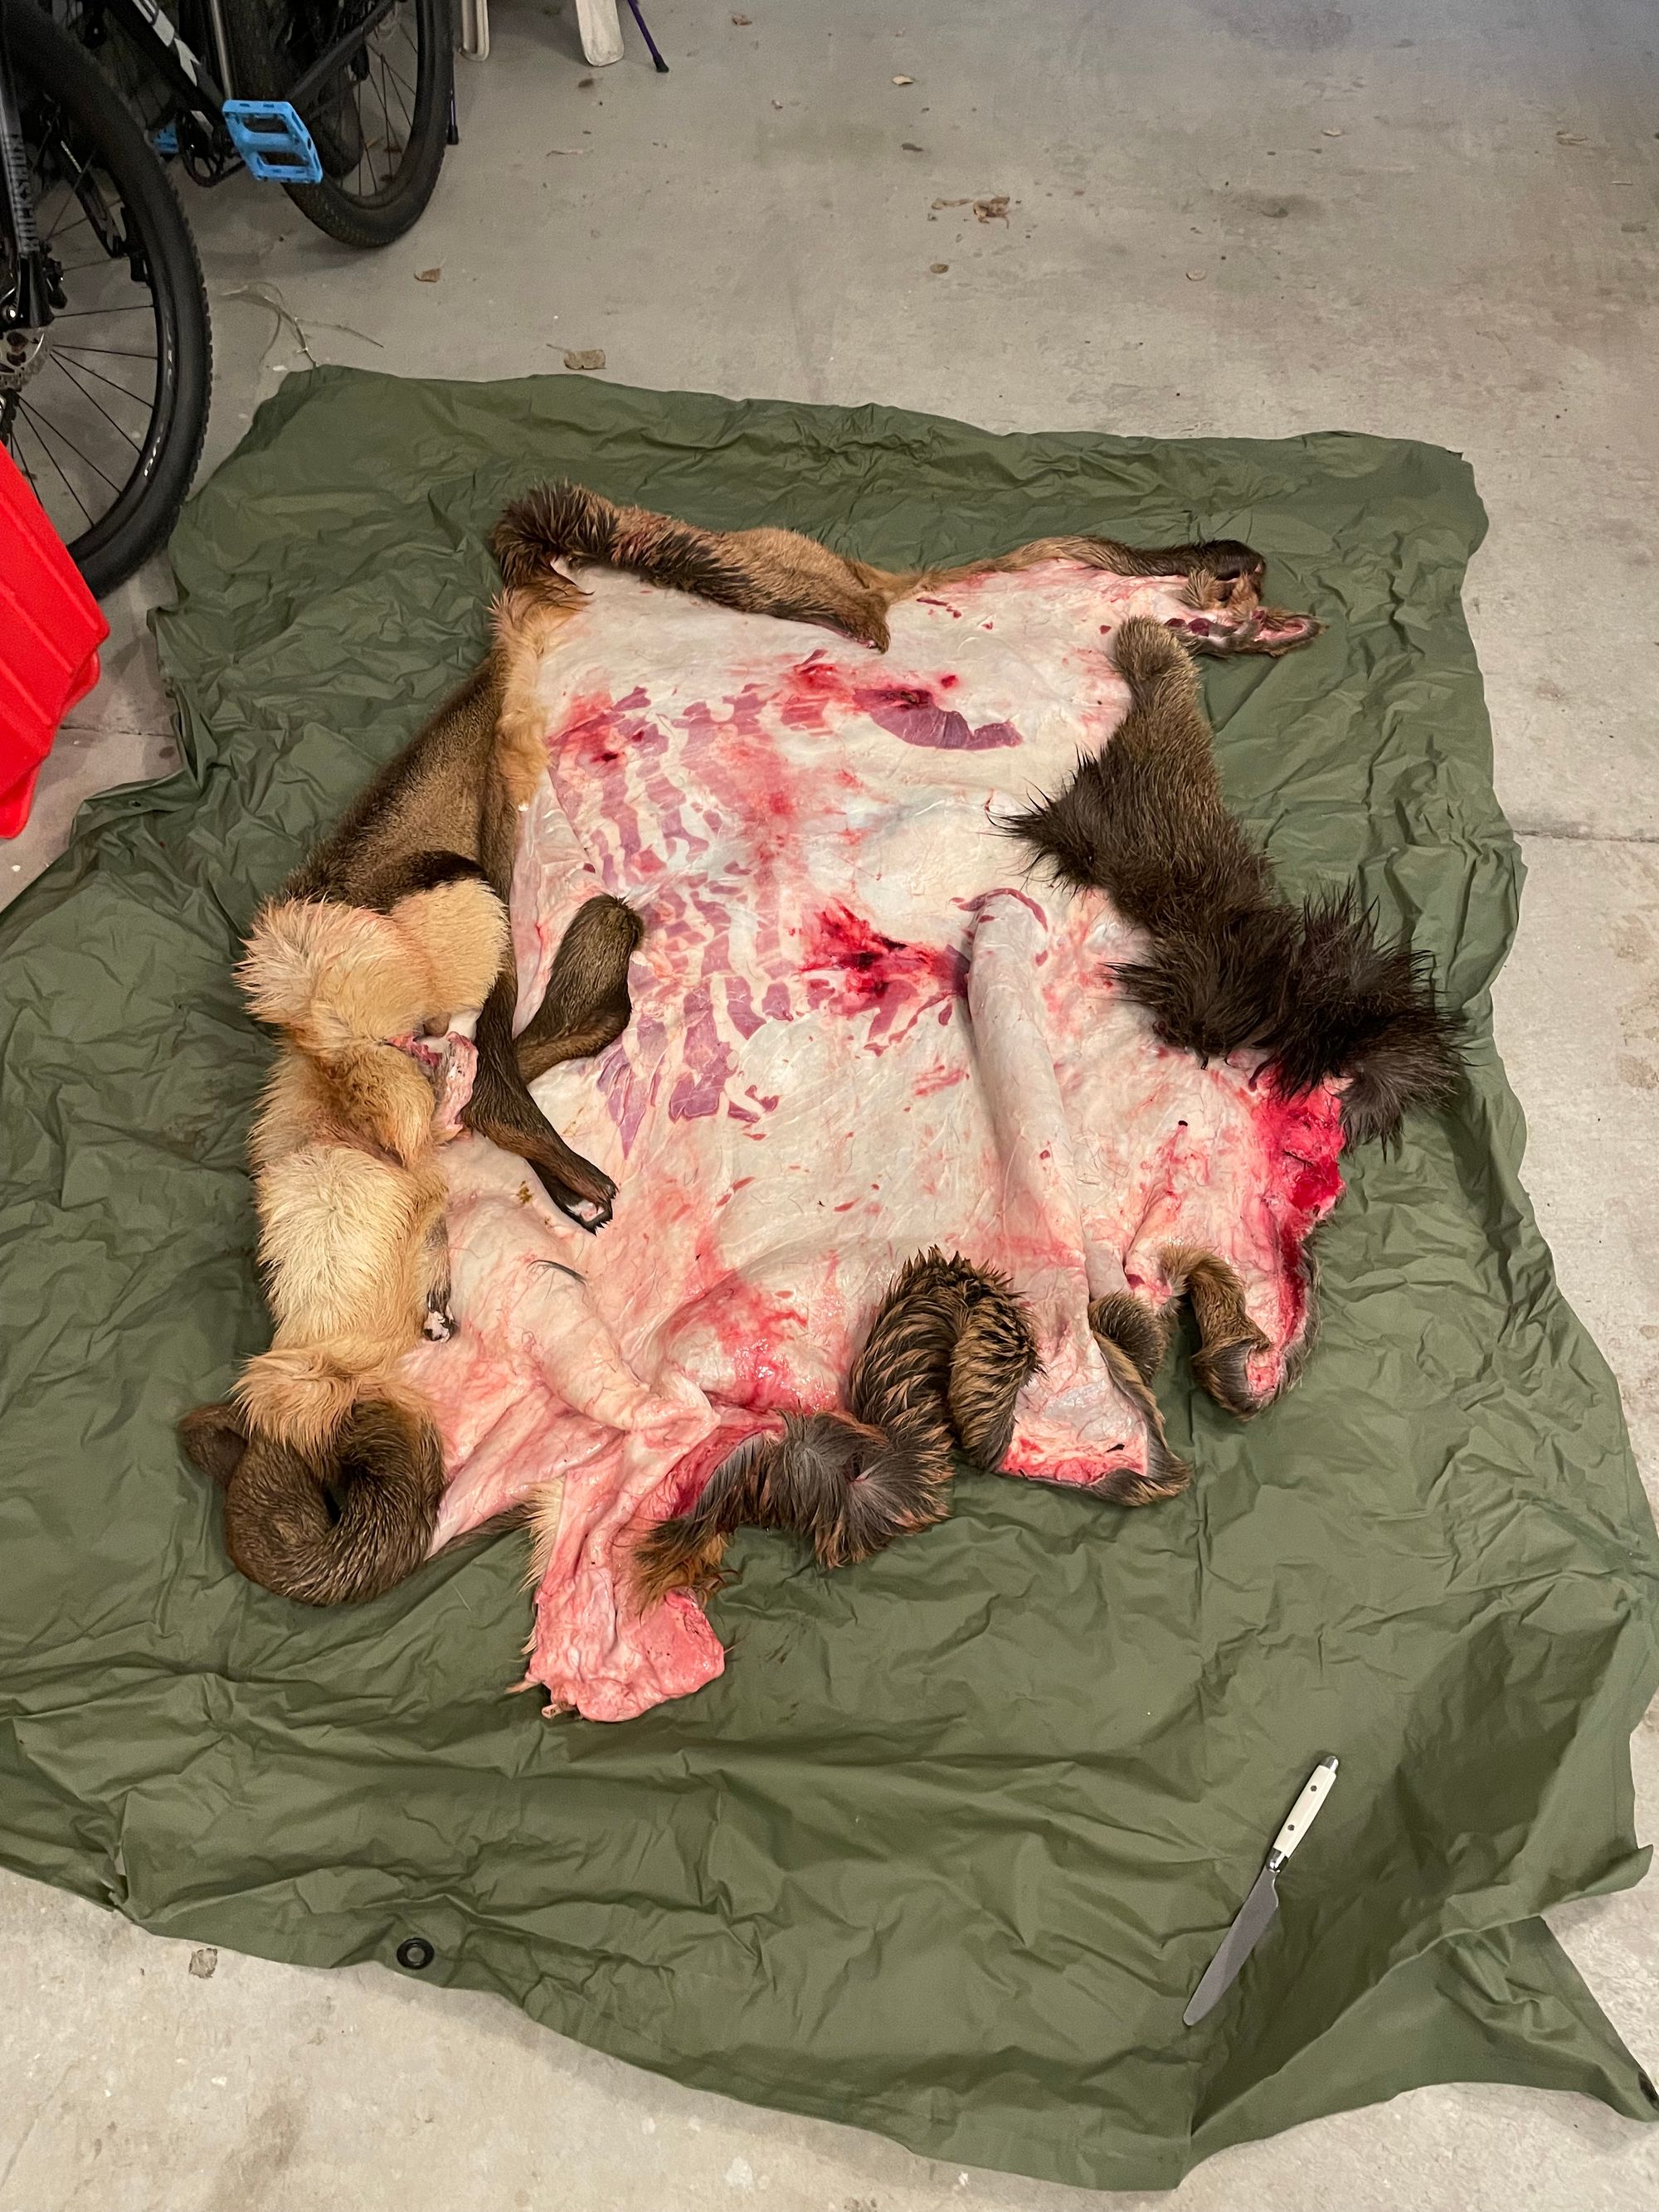
Stages of fleshing
I removed the tail, but there's a technique to remove the tailbone and leave the tail fur. (See this clip.)
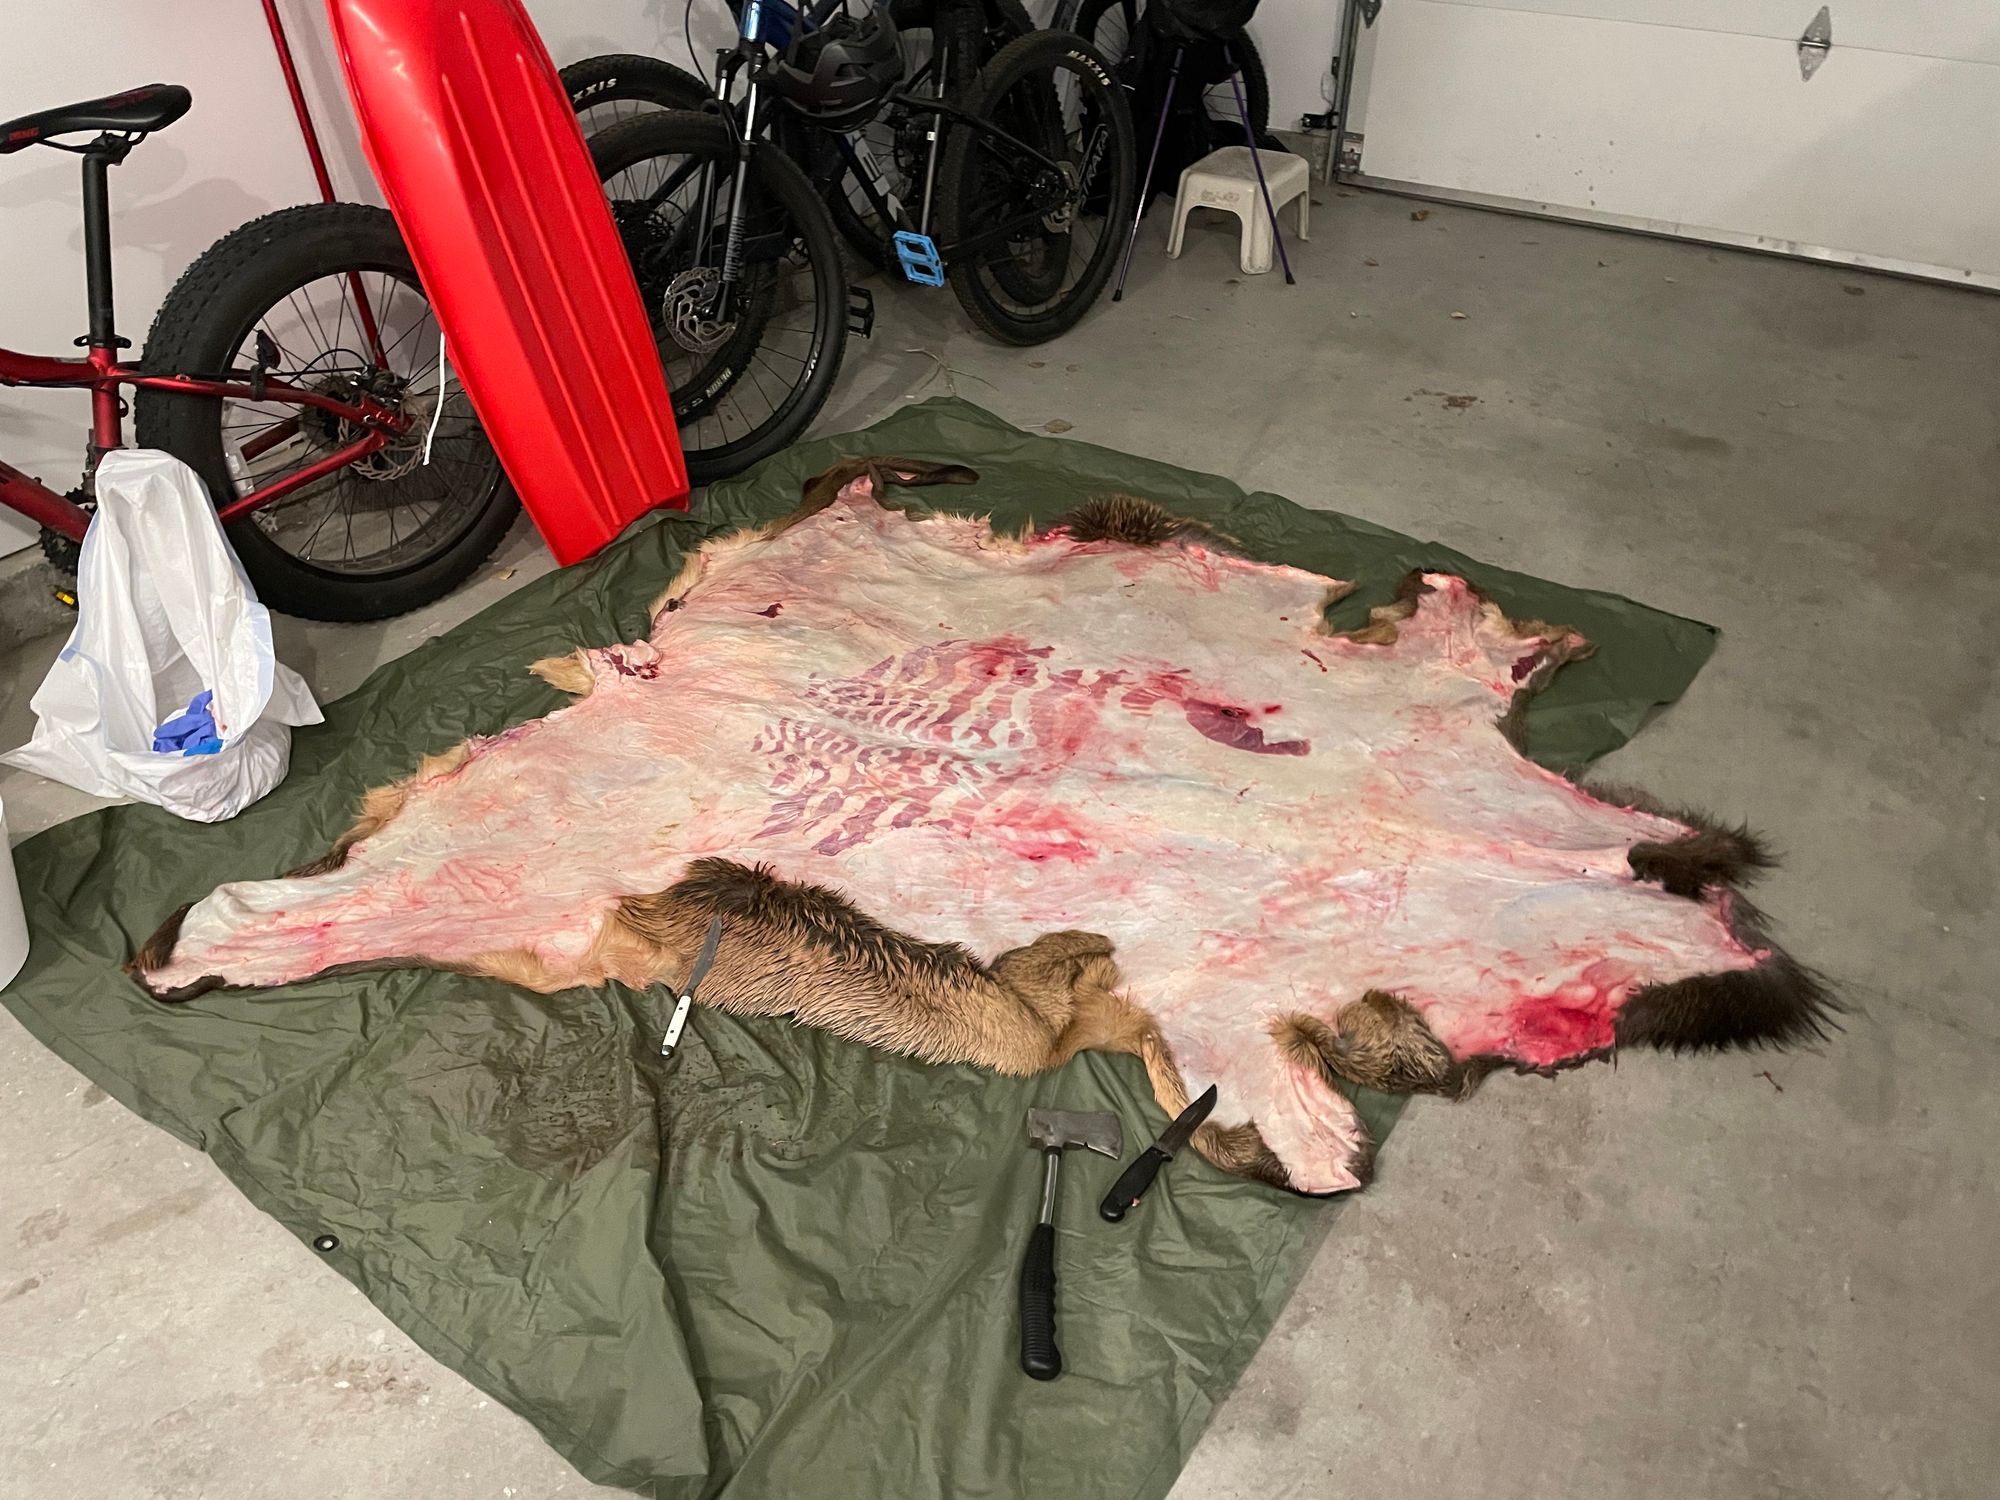
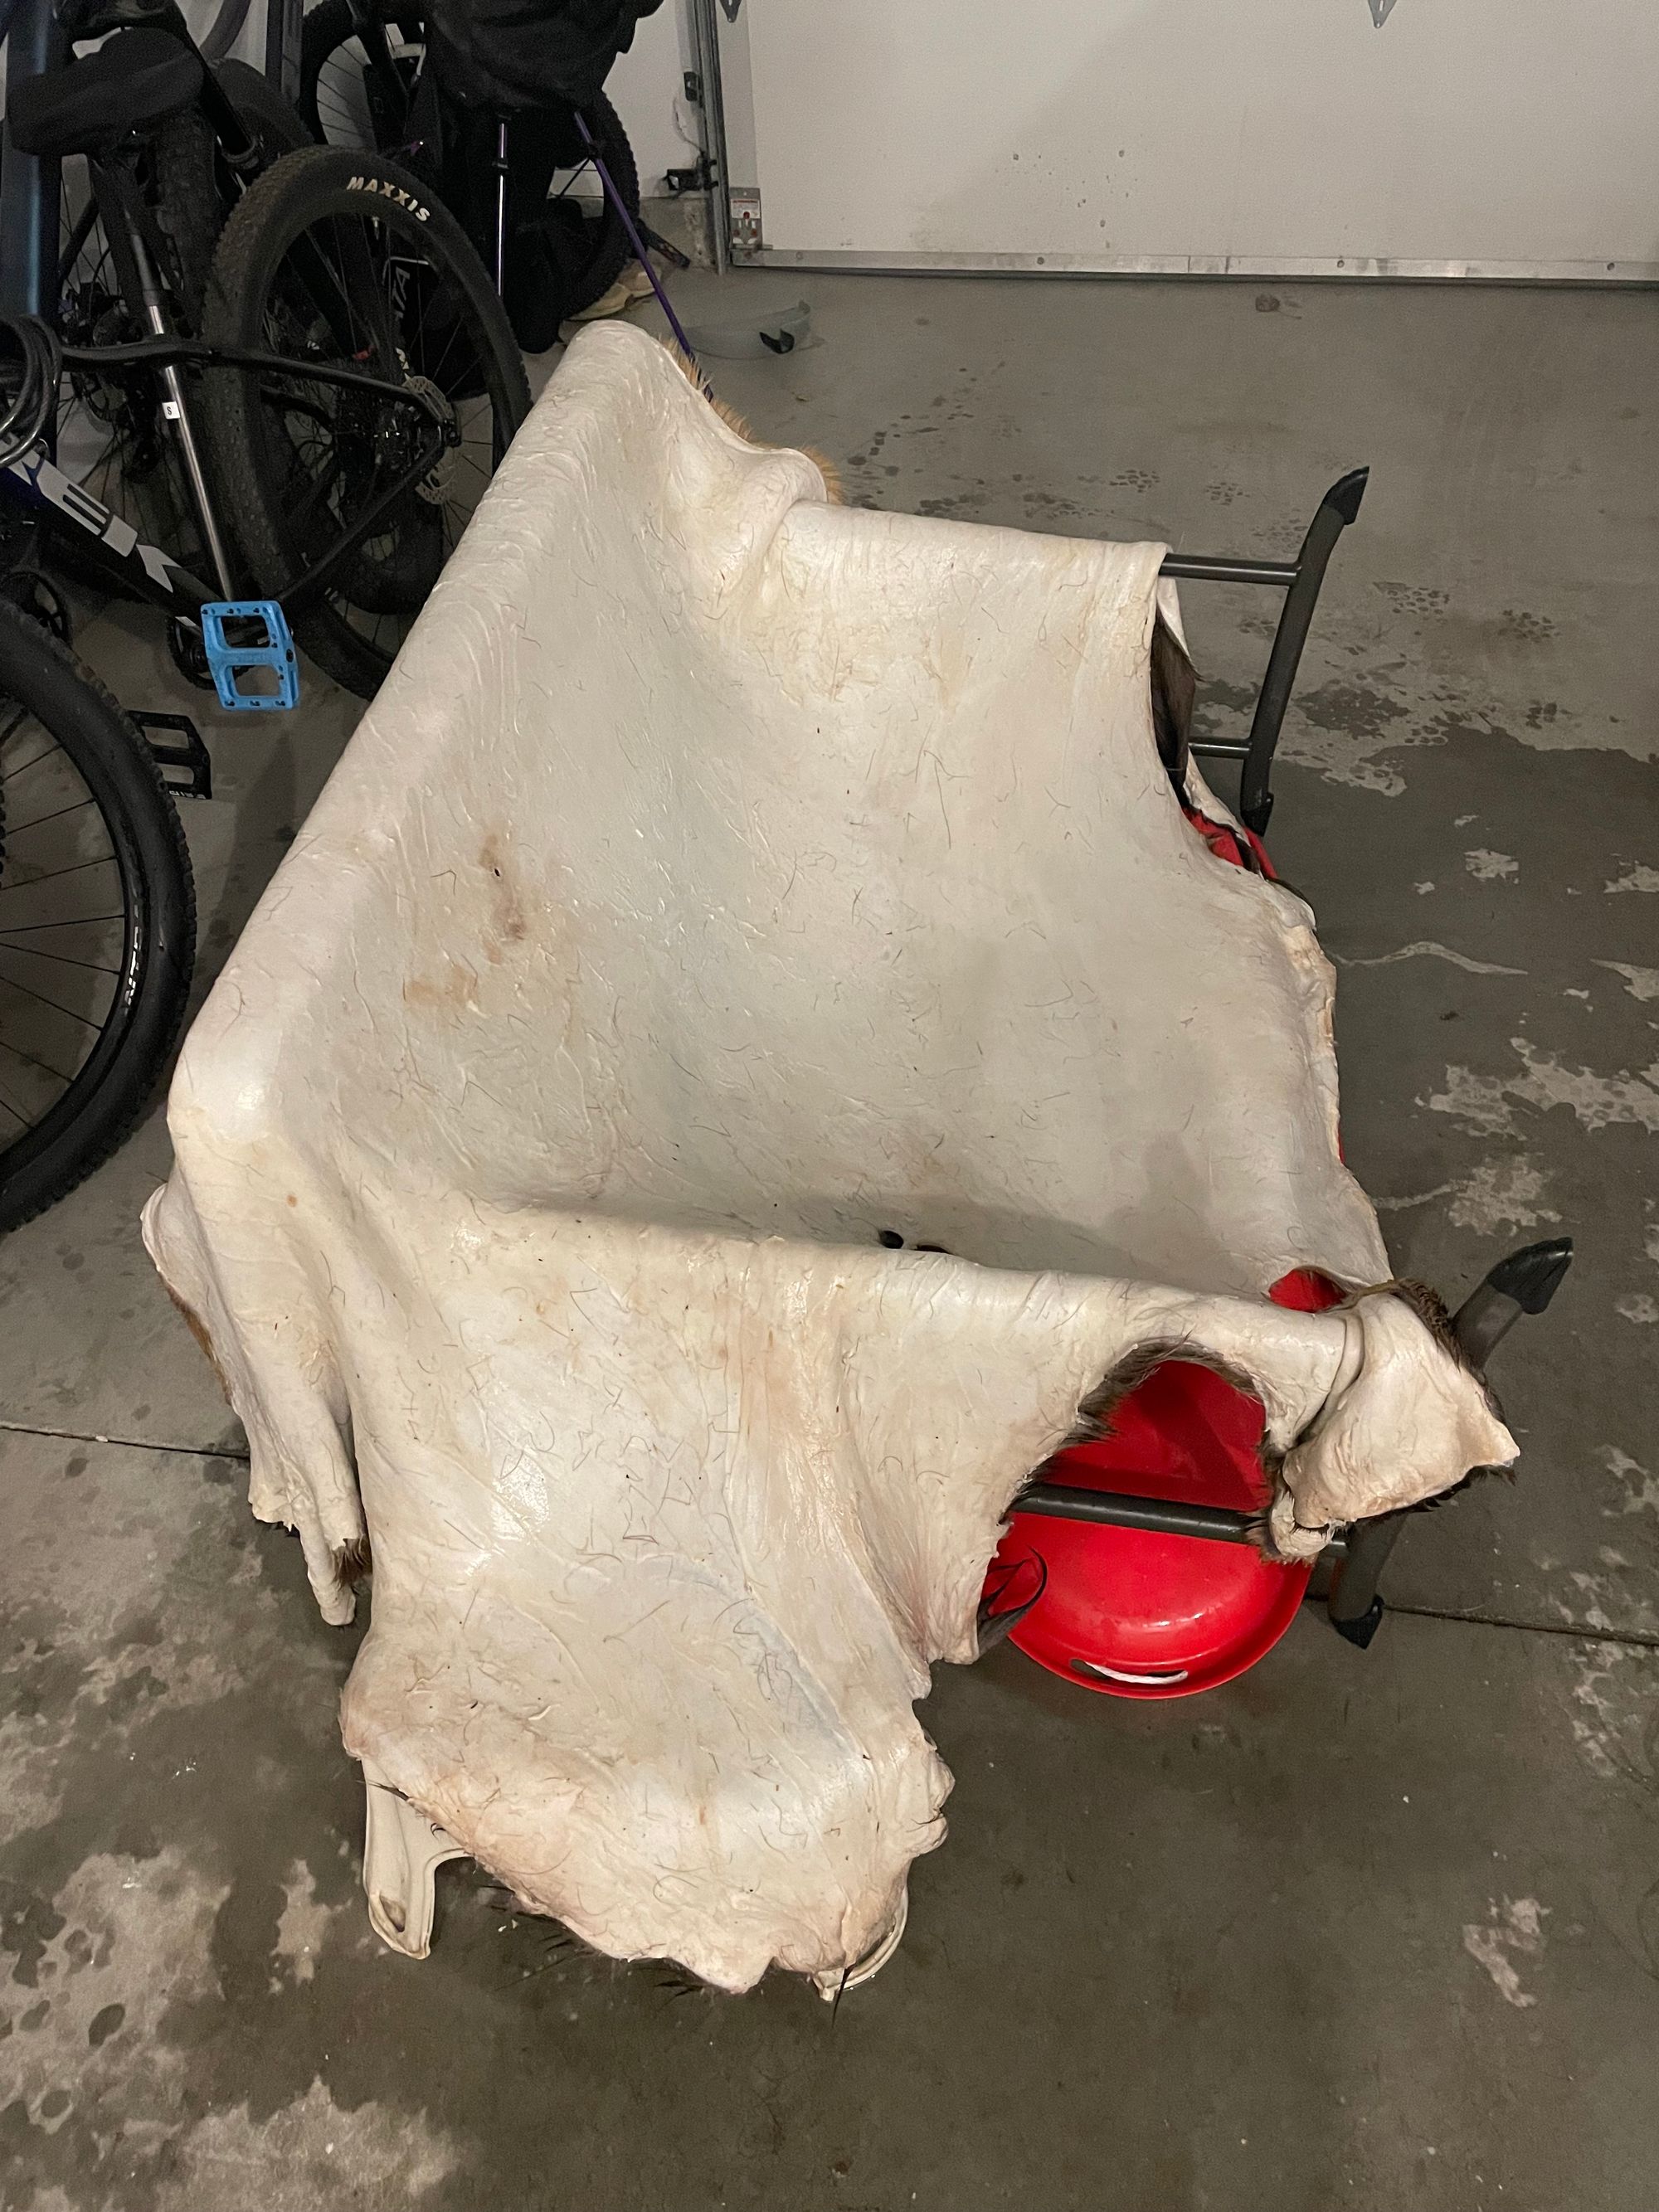
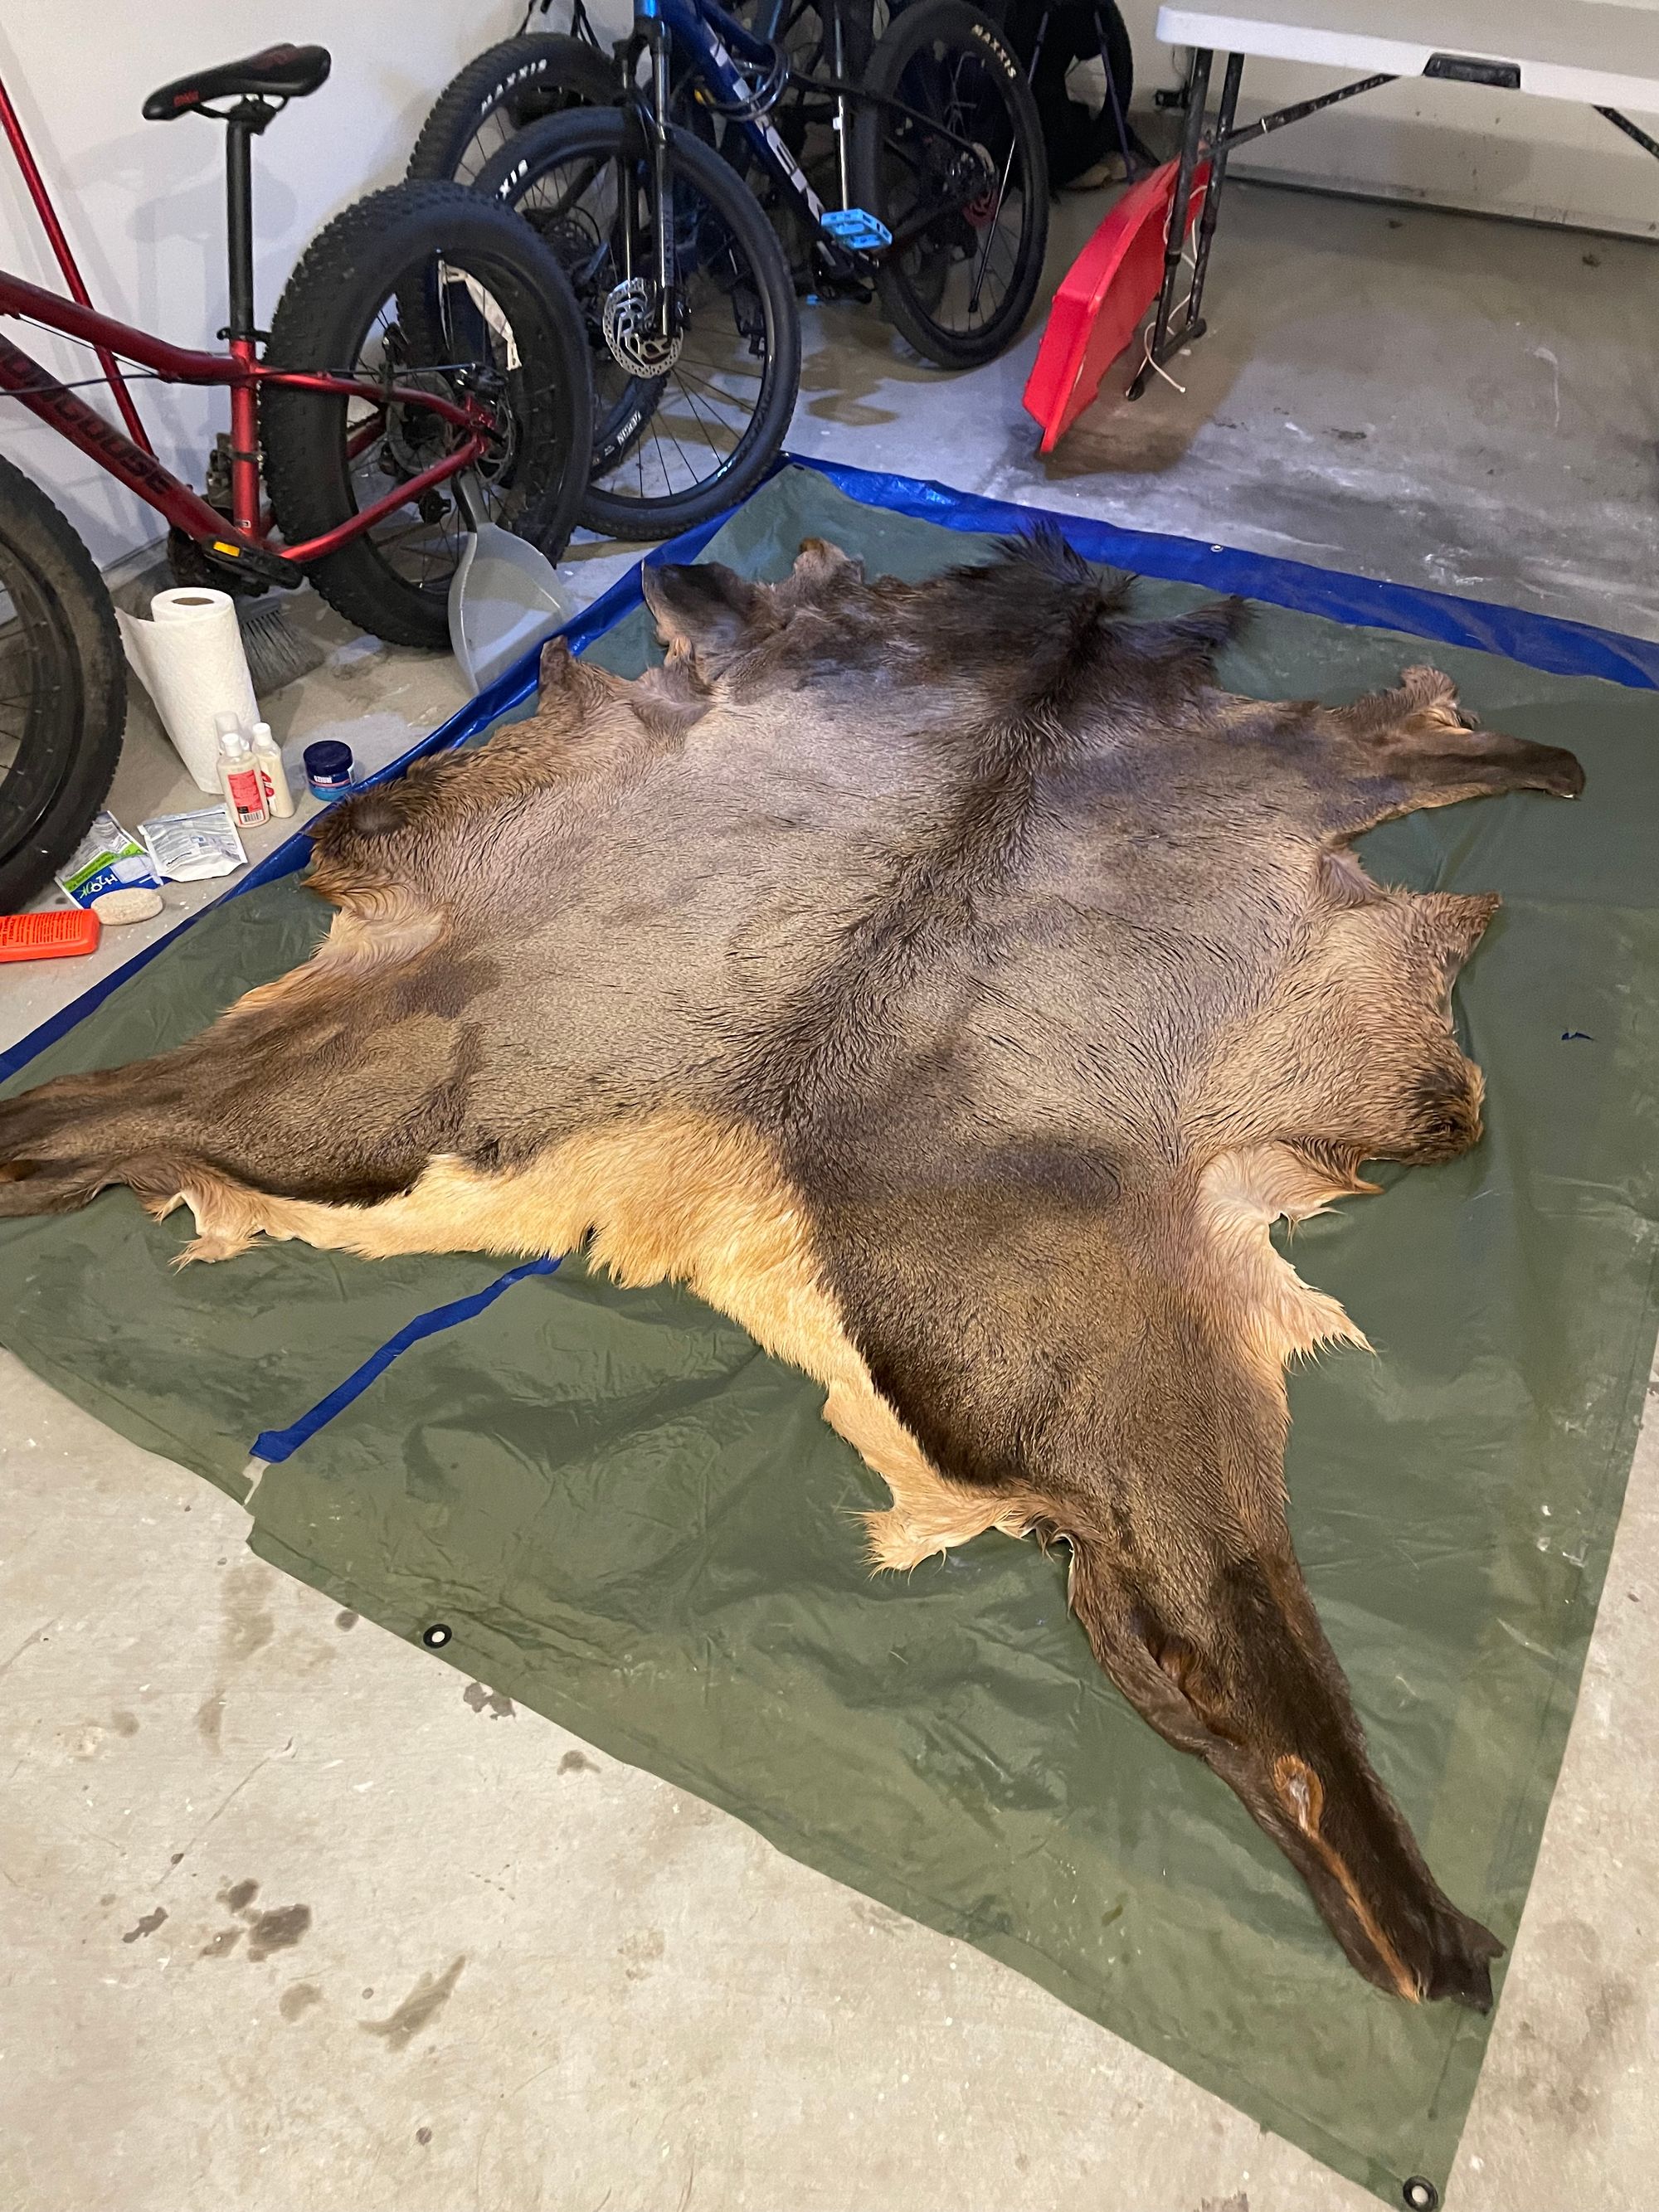
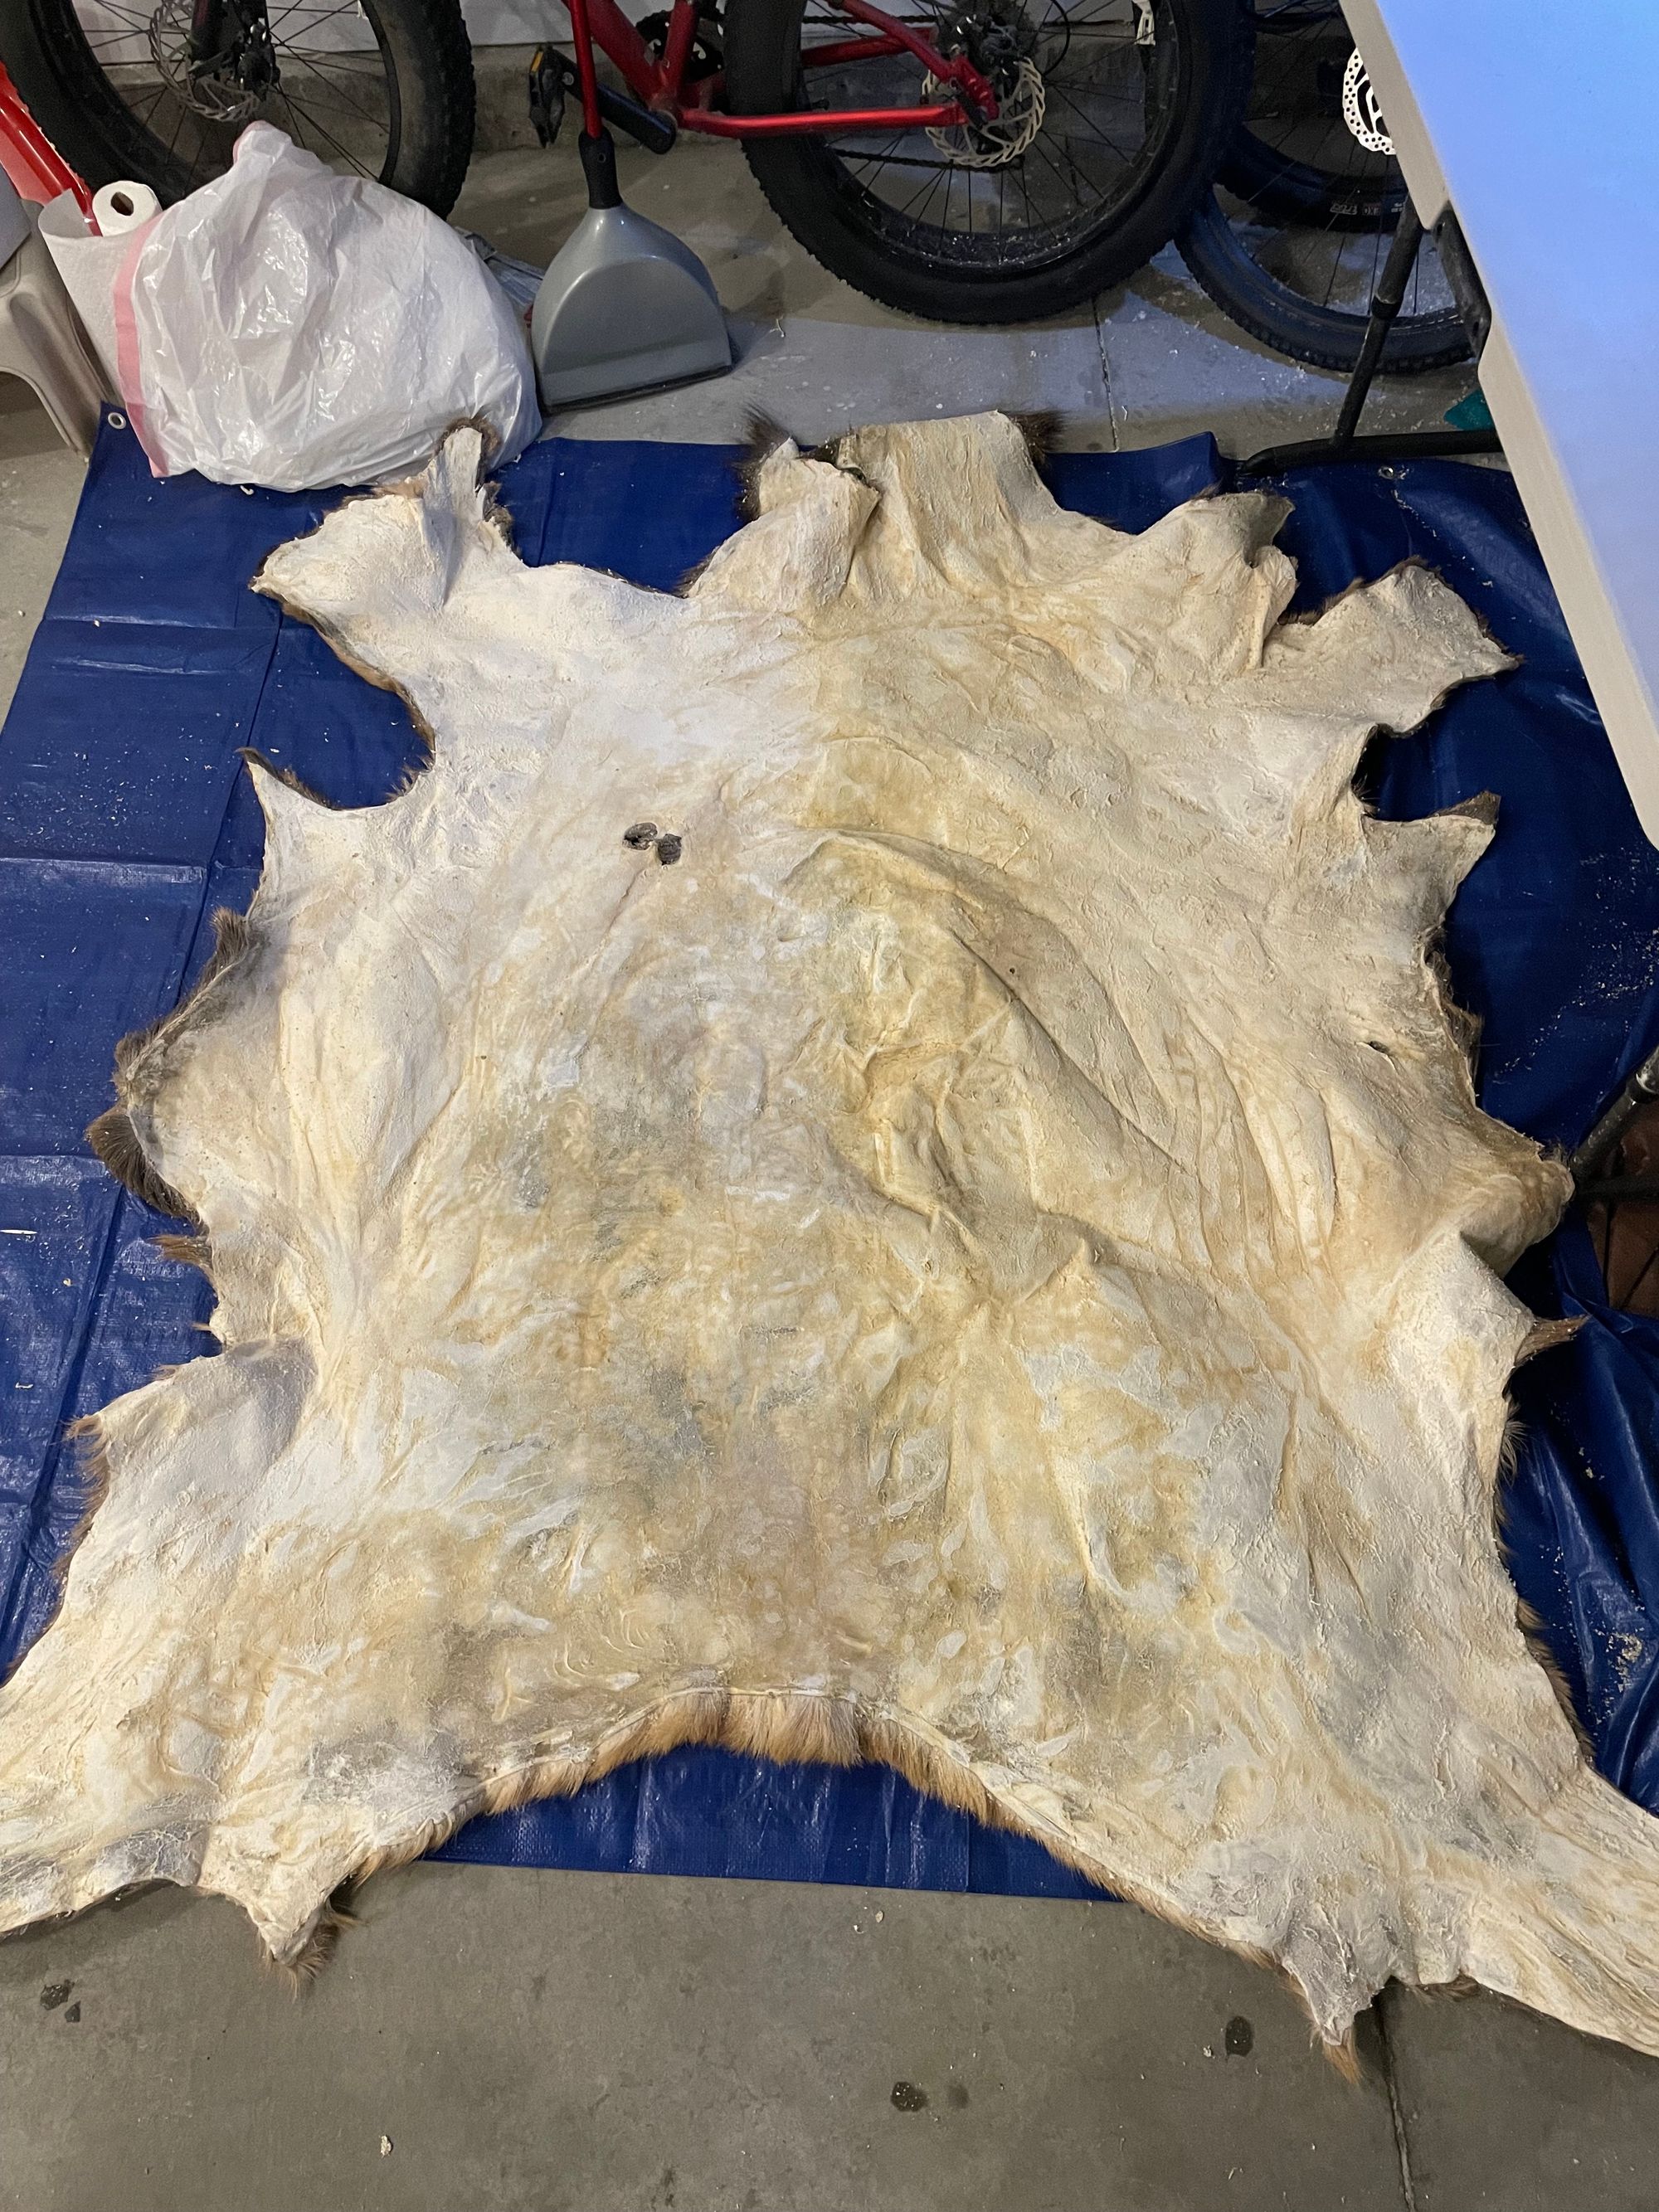
Once fleshed, I laid the hide hair-down on a tarp for salting.
Salting (2 days). I sprinkled ~6lbs of fine-grain, non-iodized salt on the hide. I uncurled the edges and packed in more salt – leave no surface unsalted. The consensus seemed to be "the more salt the better."
Tip: During the pickling and neutralizing steps, I found cheaper "pickling salt" at the grocery store. Next time.
Periodically, I mopped up puddles on / around the tarp. Be sure to clear the area of anything you don't want stained by blood. (And secure from pets.) I added more salt after 24 hours. In retrospect, I could have scraped off the wet salt and replaced it with a new layer of dry salt.
According to most guides, iodized salt distorts the hide's color and rock salt crystals are too large to draw out enough moisture. I found some dissenting opinions, but fine, non-iodized salt seemed to be consensus.
A few resources: Brain Tan on hide storage; Van Dyke's guide to tanning (see steps 1 and 2); Steel Horse Leather tanning guide; Amy's Taxidermy.
After two days, fluid stopped pooling / draining. I scraped off the wet salt using a dustpin and shook the remainder onto the tarp. The hide looked fairly consistent. Blood and most natural fluids drained out.
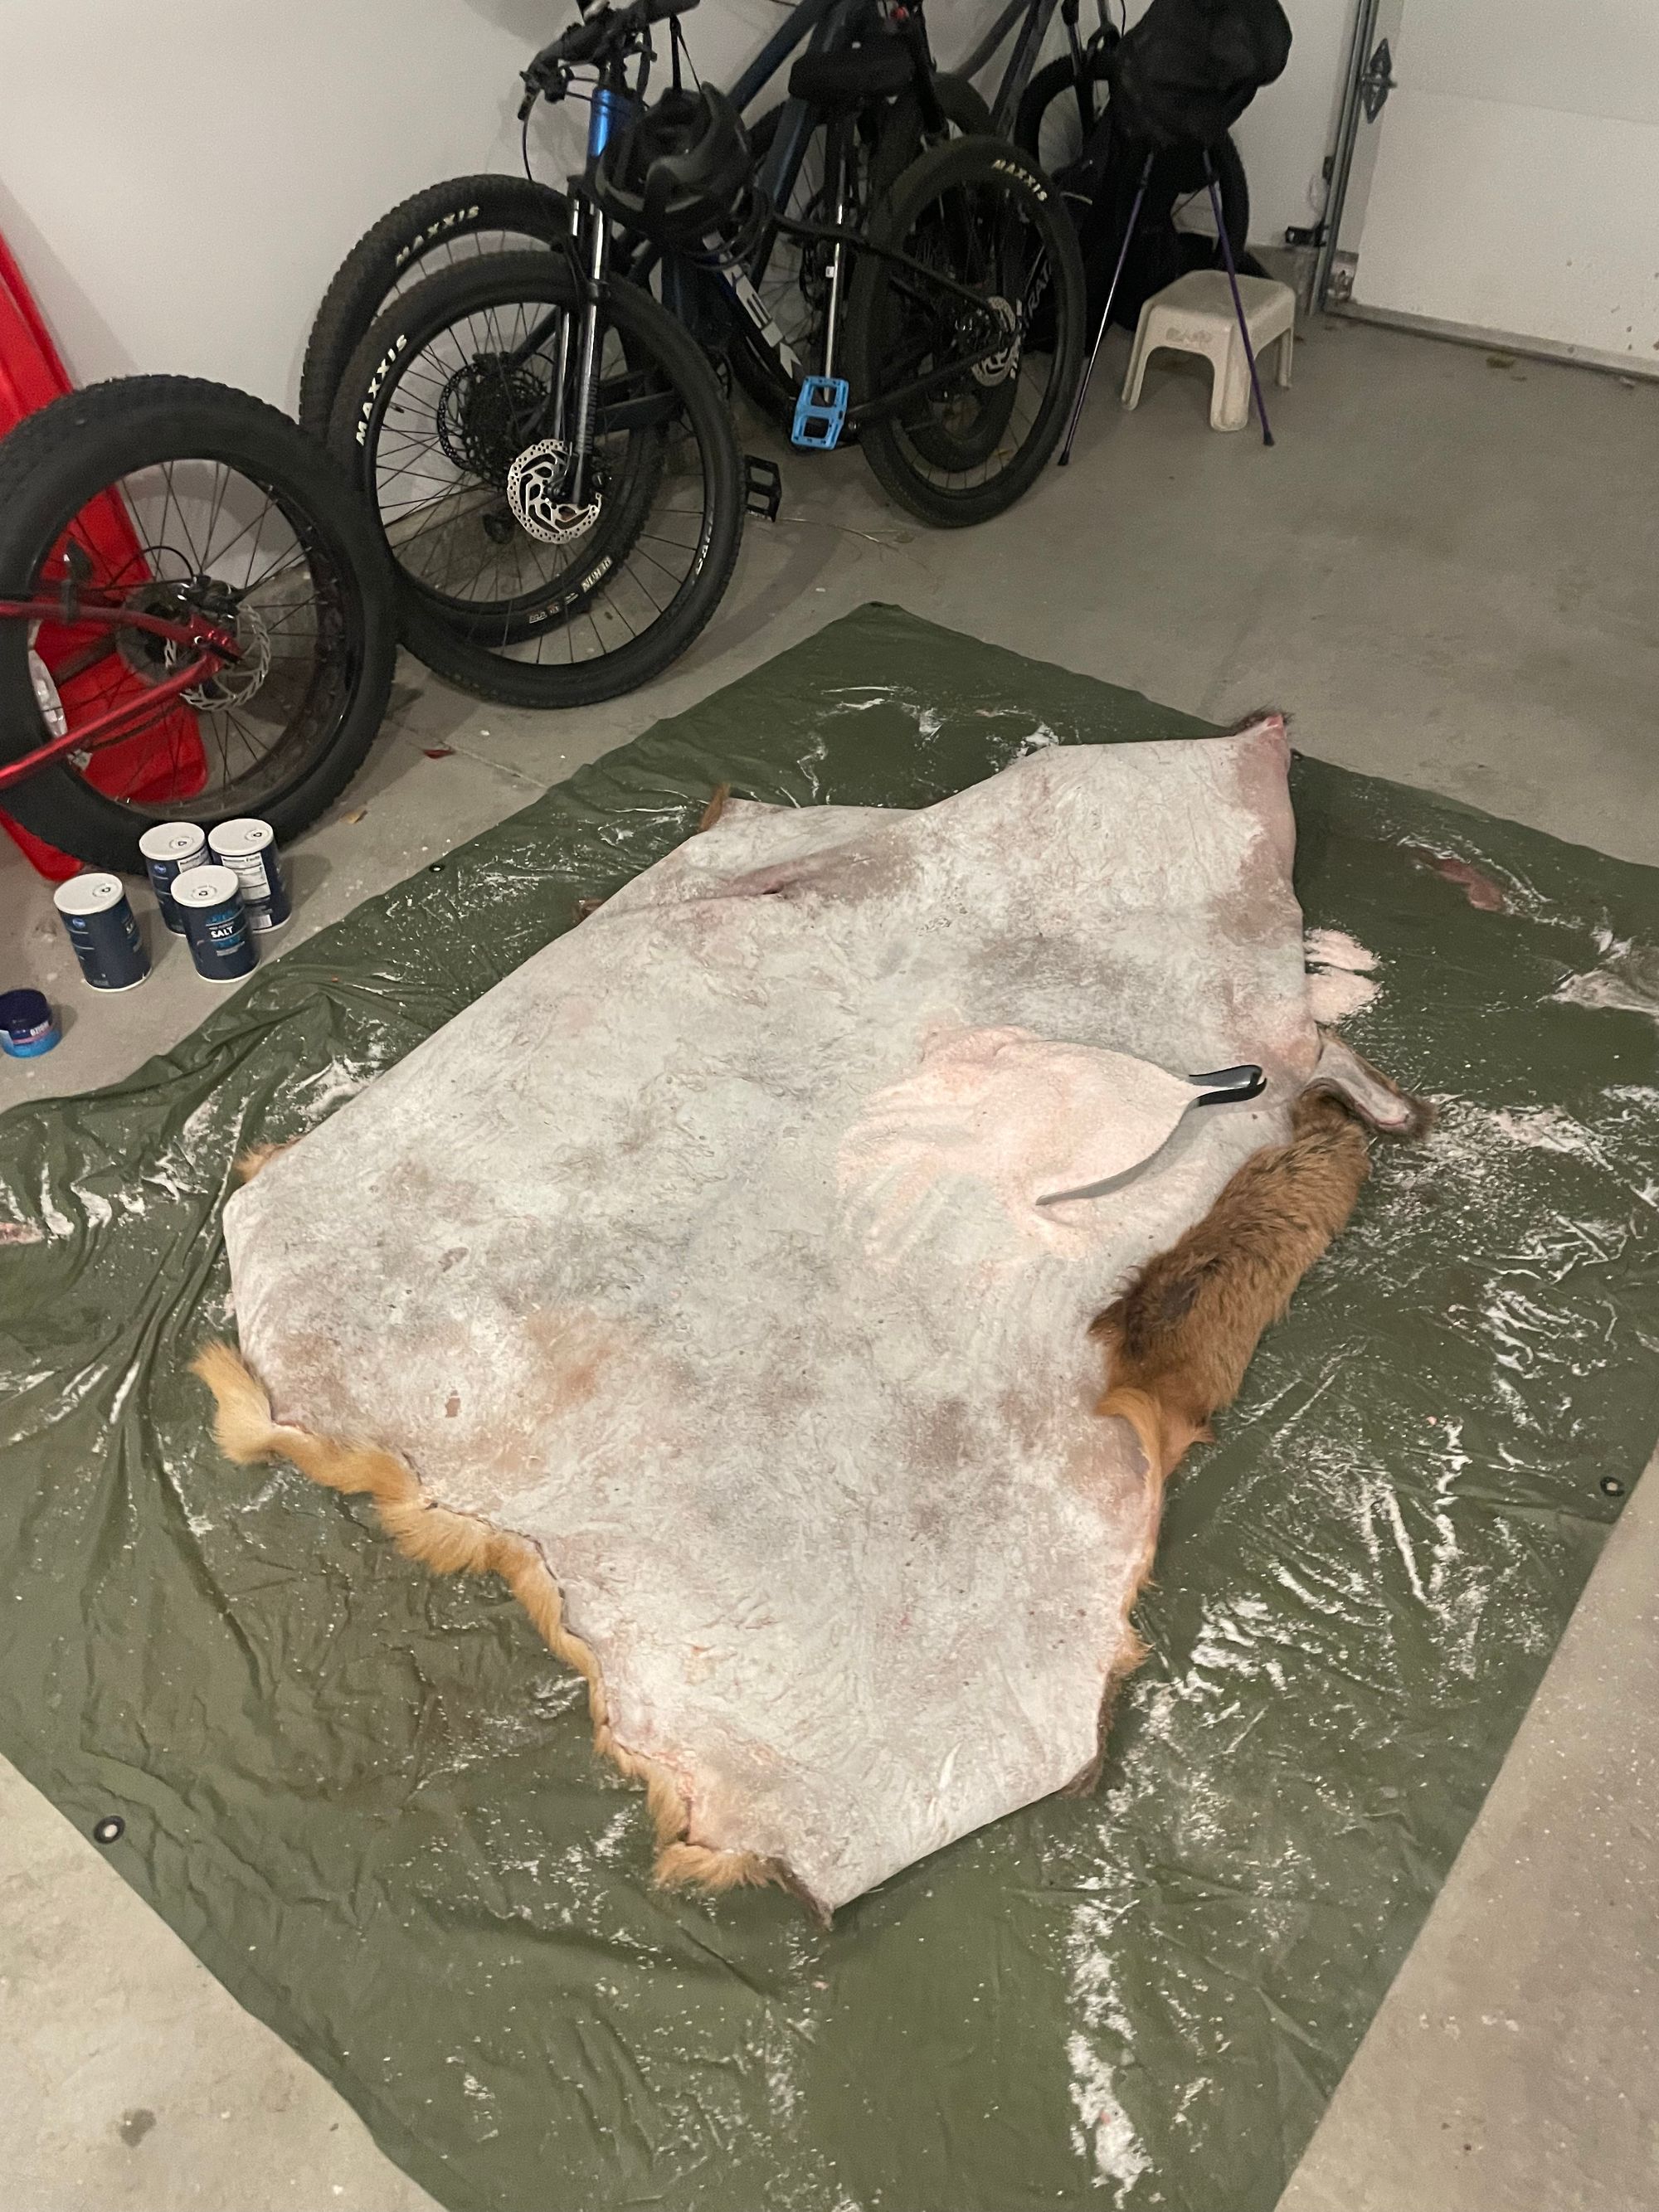
Adding and then removing salt
Rehydrate / clean and drain
Most guides suggested rehydrating in a brine solution after salting. But I found some inconsistency, especially for fresh hides. At a minimum, I wanted to remove blood / dirt from the fur, so I opted for a rehydration / cleansing bath.
Materials:
- 20-gallon tote or bucket (seemed to be consensus for a medium elk hide)
- Another box of non-iodized salt (only 2 pounds for a quick bath)
- A cup of natural laundry detergent to help draw out blood / dirt
- A tab of bleach to help kill any remaining bacteria
Caution: If using, don't allow the hide to soak too long (safest to skip)
My process:
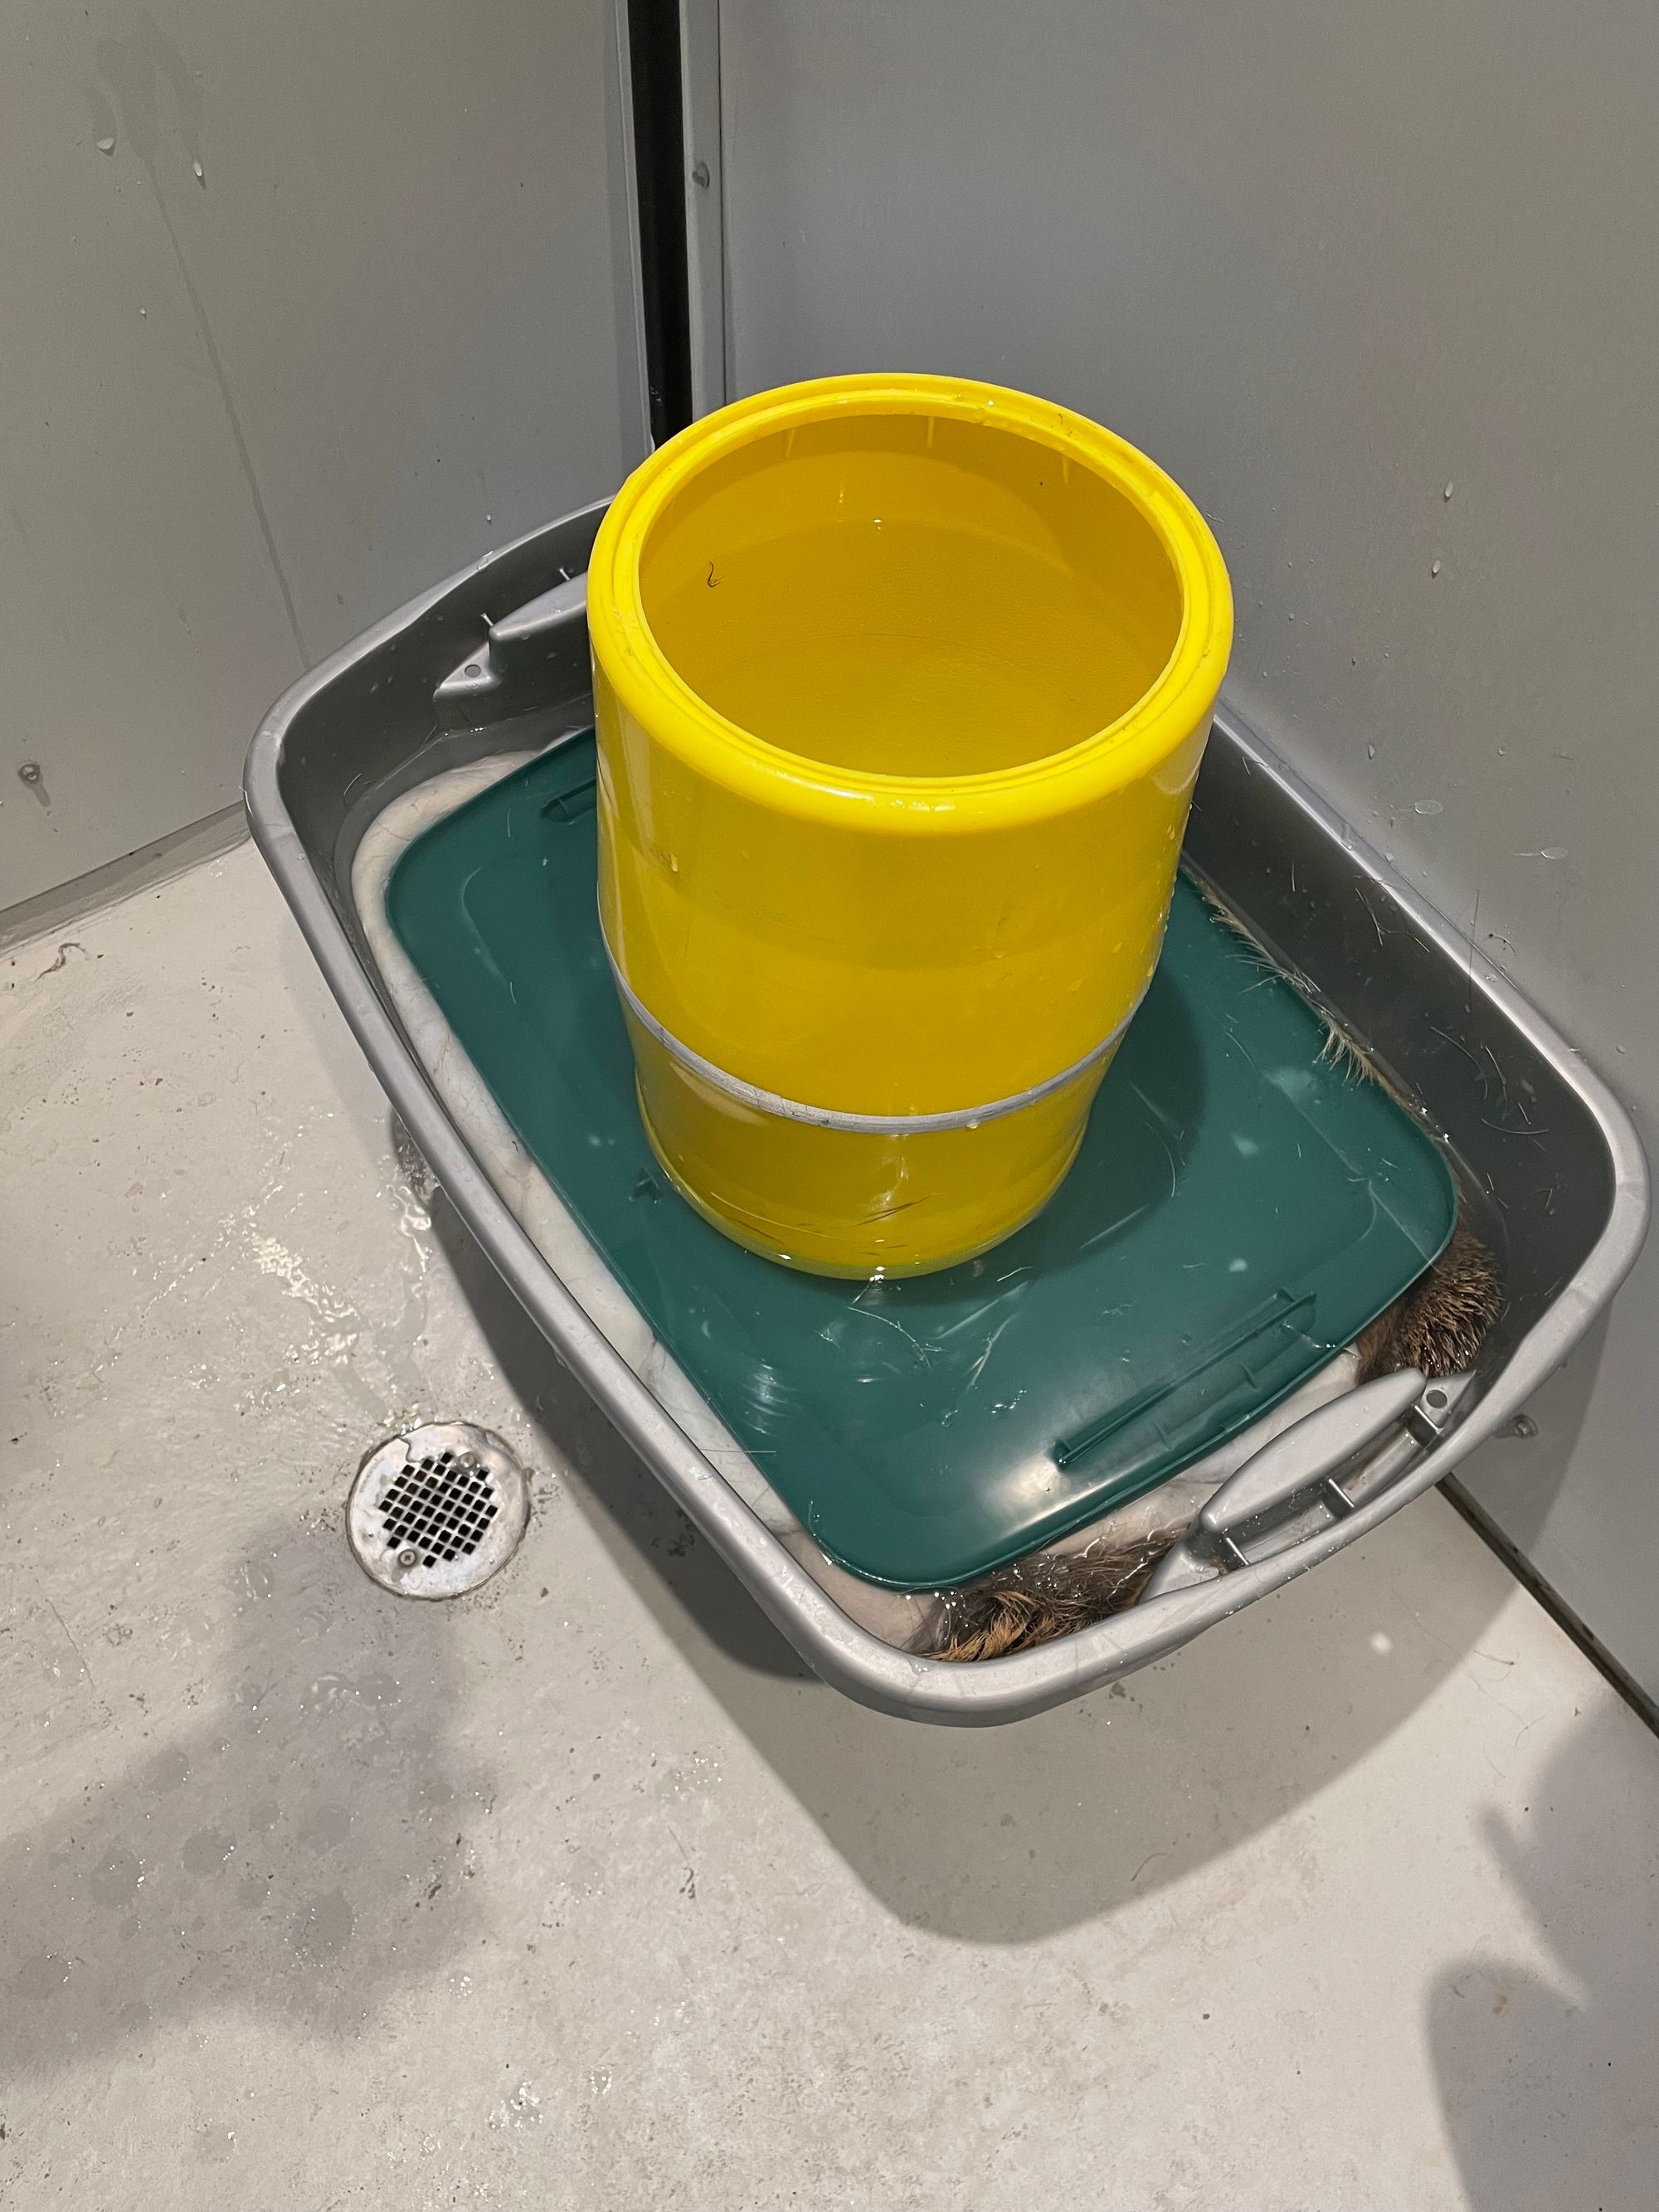
Rehydration bath (15 minutes). I prepared a 10-gallon bath in a 20-gallon tote with non-iodized salt, natural laundry detergent and a bleach tablet. I started with hot water to dissolve the salt. Then, I set the bin outside to cool. It was early December and below freezing in Jackson, so 30 minutes did the trick.
Most articles caution against soaking the hide in any warm solutions – risk of accelerating bacteria growth and loosening hair follicles.
I used the shower in my garage for baths – easy to drain and no concern of damaging the concrete floor. I soaked the hide, gently working detergent into the fur, careful not to pull out more hairs than necessary.
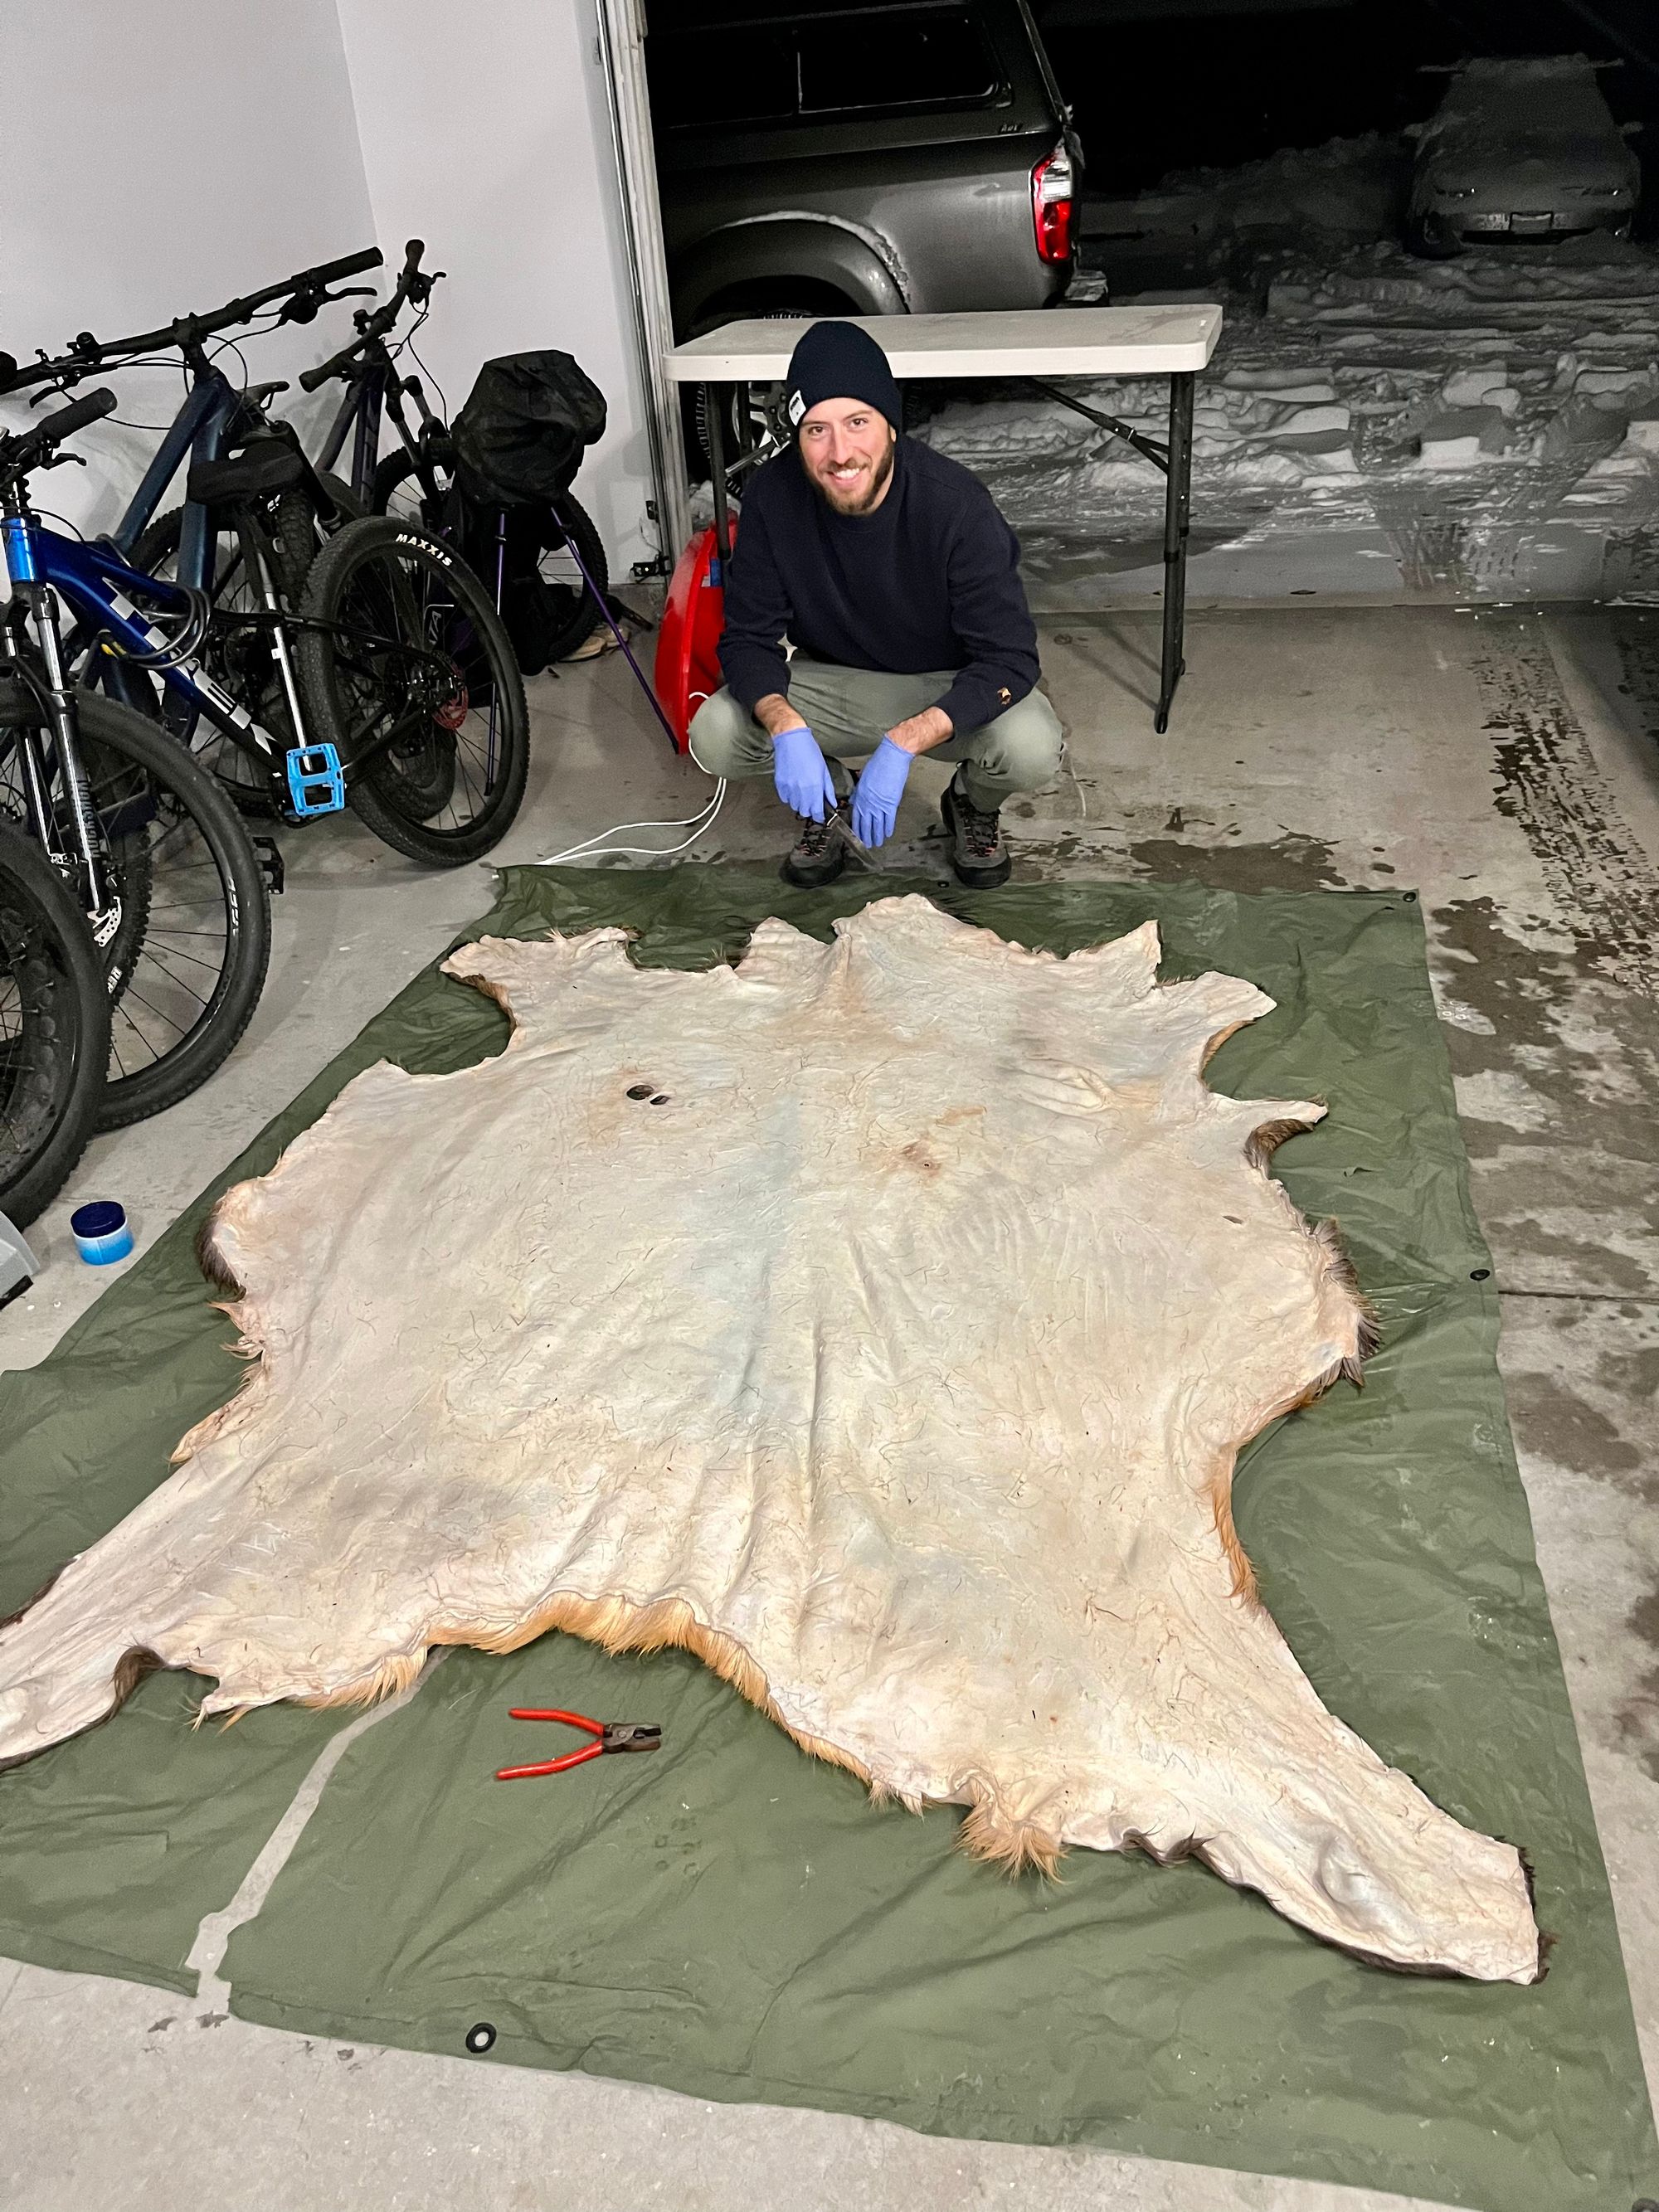
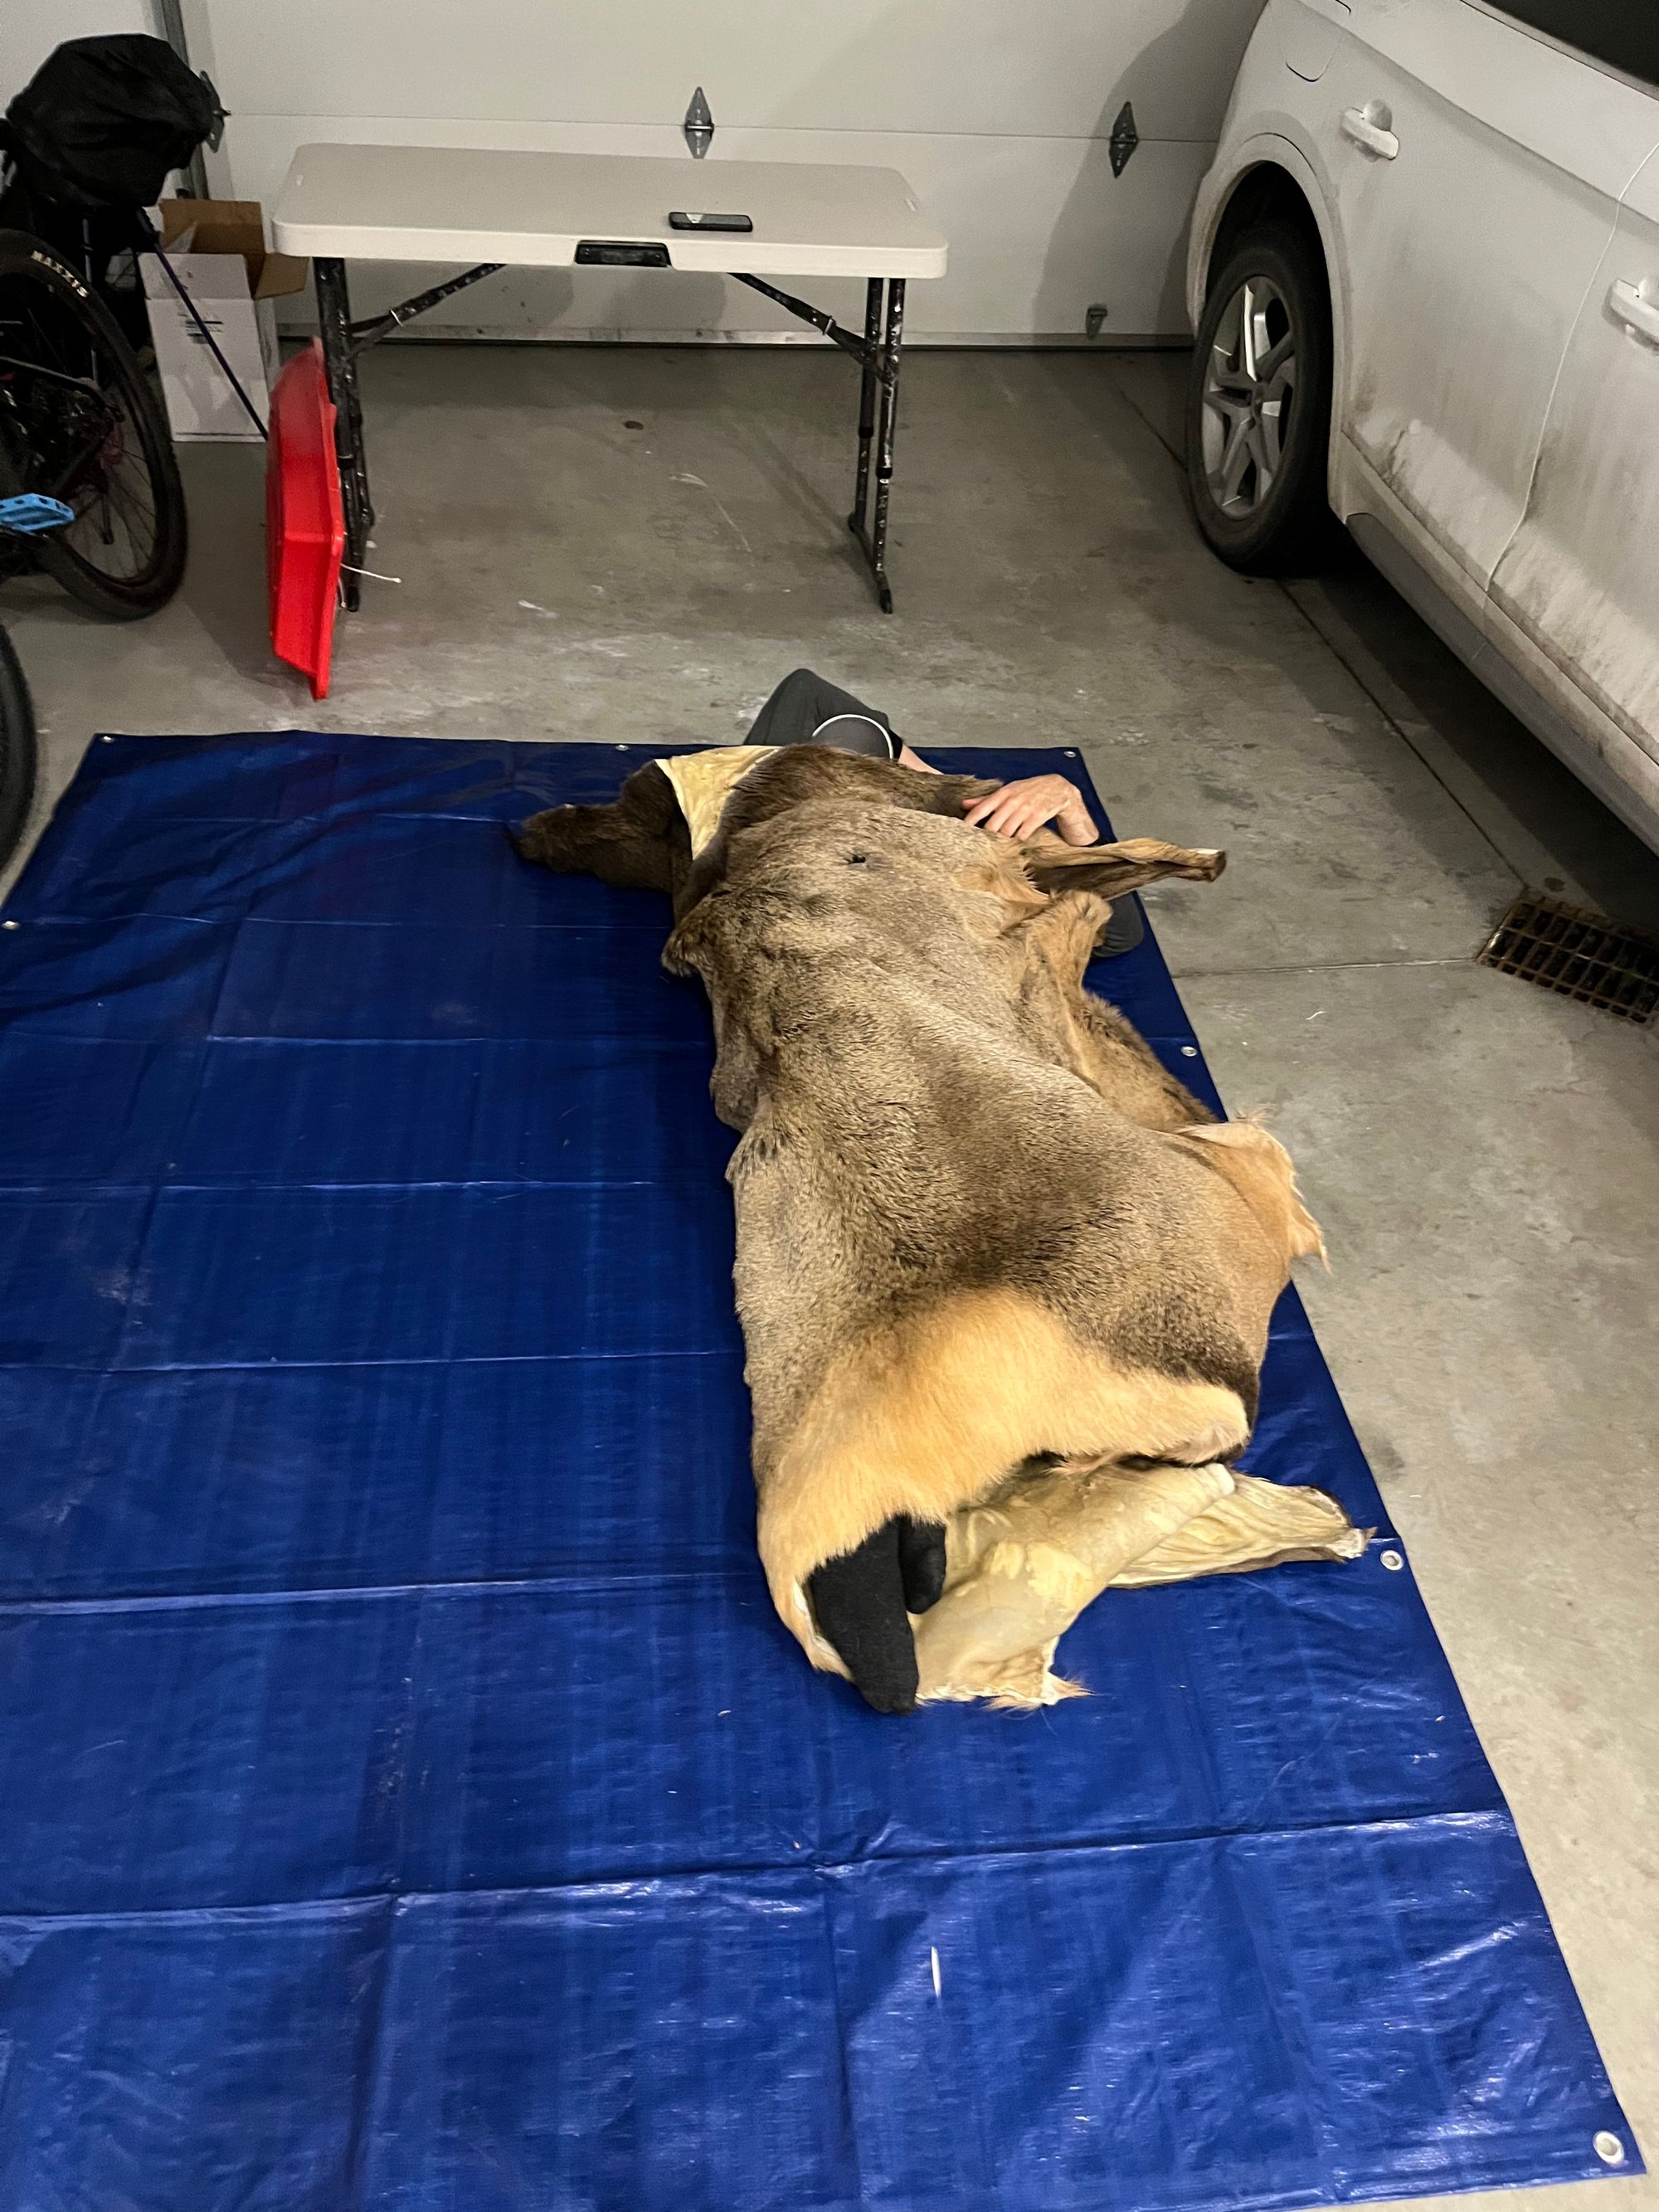
Draining (24 hours). After ~15 minutes, I removed the hide and draped it over a plastic folding table, laid sideways on the tarp. I didn't bother buying new drying racks.
I used the same tarp for salting, but rinsed off the salt, blood and other fluids beforehand. After 24 hours, the hide was still damp, but no longer dripping.
Pickle, neutralize, rinse and drain
I spent hours researching pickling. Some guides claimed it was absolutely necessary. Others, including the "orange bottle" instructions, skipped it.
From what I could tell, soaking the hide in a mildly acidic solution tightened hair follicles and killed remaining bacteria. I didn't find much downside, assuming a pH near 2.0 was maintained. Despite the inconvenience, I opted to pickle.
Van Dyke has a more detailed article on pickling. According to Amy's Taxidermy, pickling breaks down unwanted proteins in the skin. I suspect chemicals in the "orange bottle" tanning solution (and others) accomplish the same ends, which would make pickling a bit redundant at worst.
Materials:
- Dish-washing gloves
- 20-gallon tote for a 10-gallon bath
- 10lbs of salt (one lb per gallon); non-iodized or pickling (cheaper); easy to find in your local grocery store
- 3oz of citric acid per gallon; I bought 2lbs to be safe; I found citric acid in Hobby Lobby's soap making section
- One box of baking soda; also grocery store
- pH test strips that extend below 2 and up to at least 5/6; close to 2 pH for pickling, then 4-5 pH for neutralizing; I borrowed strips from a friend (couldn't find at nearby retailers)
My process:
With the rehydration bath, I'd started the clock (or so I was told). Salt inhibits bacteria. Pickling / tanning kills it. Salt absent, bacteria can multiple.
Believing I couldn't wait for shipping, I drove to Idaho Falls for supplies. On my list: citric acid (Hobby Lobby), "orange bottle" tanning solution (Cabela's), pH test strips (Home Depot) and baking soda / pickling salt (grocery stores).
When I got home at midnight, I realized the pH test strips didn't extend to 2. Luckily, my friends at Highpoint Cider in Victor had full-range test strips. I drove back over Teton Pass, narrowly missing a cow / calf moose and returning with full-range test strips at 1am.
Pickling (72 hours). I filled the 20-gallon tote with 10 gallons of warm water, then added the salt and stirred until dissolved. I moved it outside to cool for 30 minutes.
Back inside, I added citric acid, periodically testing the pH. It took all 5 pounds of the crystals from Hobby Lobby. I imagine they weren't as potent as tanning-specific solutions from outfitters. The pH was slightly above 2, but I wasn't driving back to Idaho Falls — close enough.
I submerged the hide in the pickle bath, using thick dish-washing gloves. I weighted the hide with a water-filled bear keg on a smaller tote lid. Any weighted object will do, as long as you fully submerge the hide.
I soaked the hide for 72 hours, periodically stirring and re-folding to ensure all surfaces were exposed to the solution.
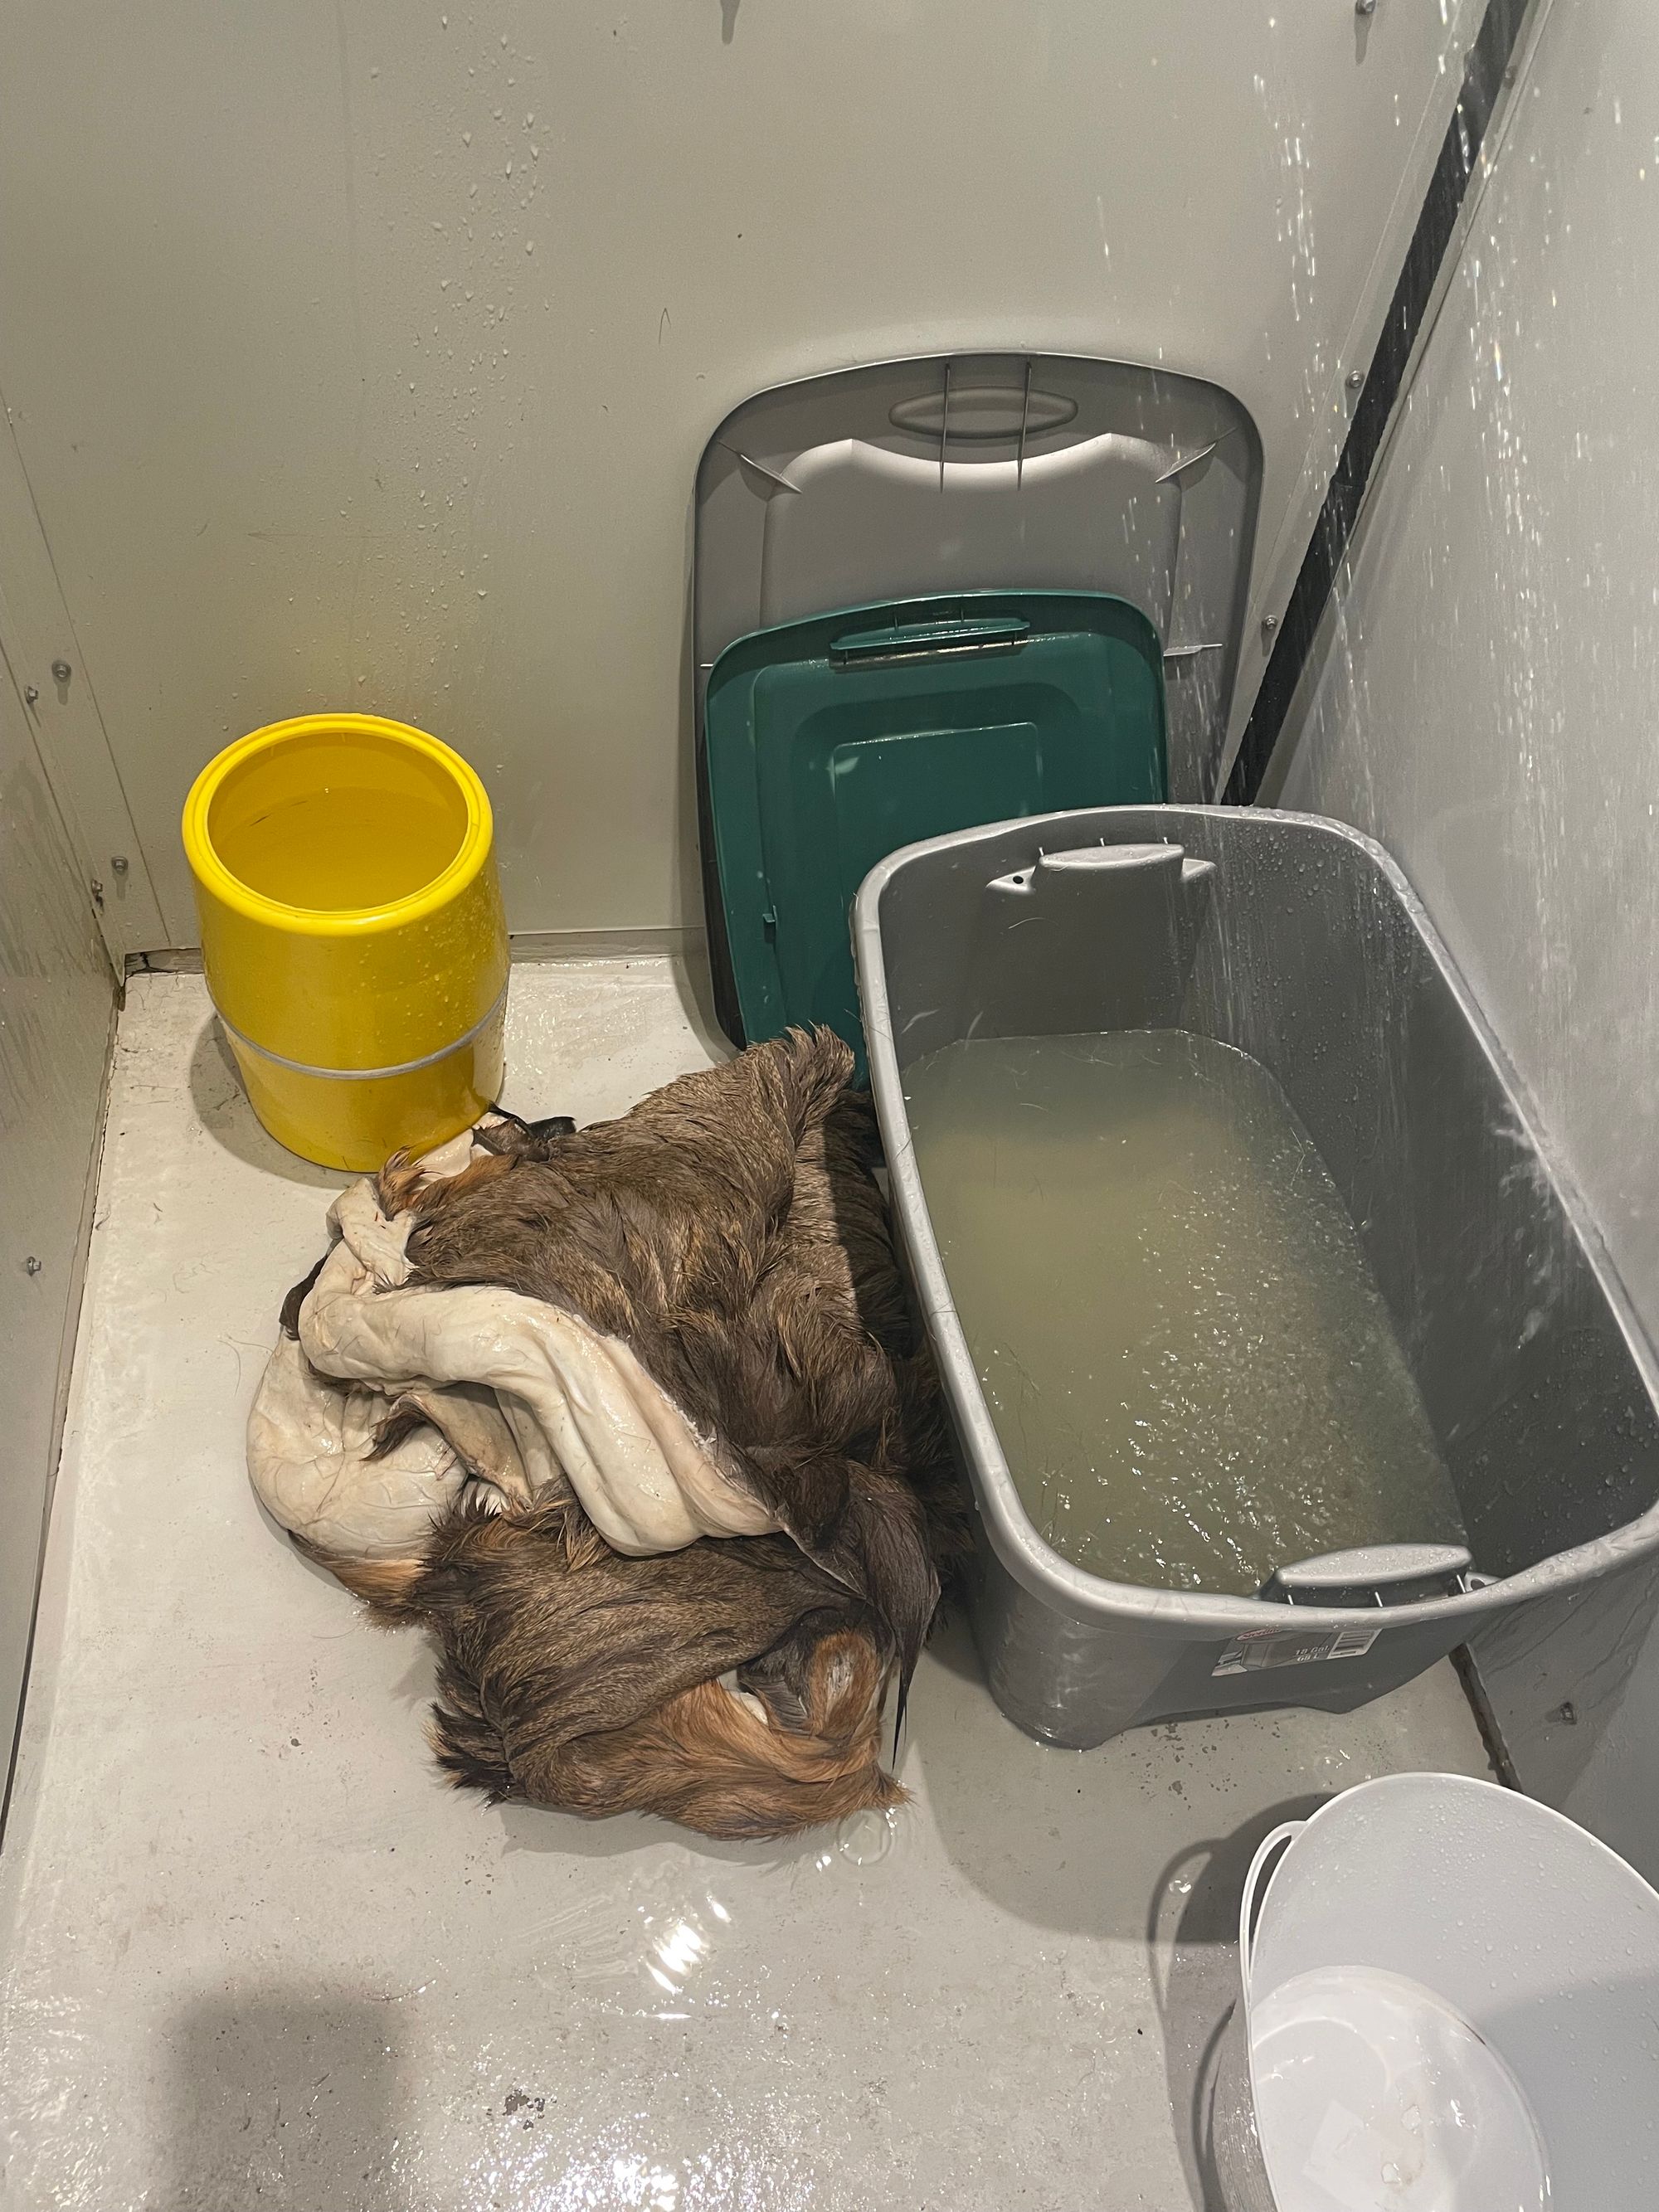
Neutralizing (20 minutes). After 72 hours, I removed the hide and laid it on the concrete floor of my shower. (For those wondering, I showered at the gym during this fiasco.) Then, I added baking soda, periodically testing the pH. One box did the trick in a 10-gallon bath. I stopped at a pH just above 4.
I soaked the hide for ~20 minutes, followed by a very quick dunk in plain, cold water. (The pickling solution was cloudy after a few days.)
I draped the hide over the folding table to drain.
Pickling bath (left); plain water rinse after neutralization (middle); draining (right)
Tan
The universe of tanning methods is mind boggling:
- Brain tanning (used by nomads) – they say each animal's boiled brain has enough oil to tan its hide
- Bark tanning with natural tannins, the origin of "tanning"
- Other natural recipes like mayonnaise / eggs, lemon juice, etc.
- Synthetic options, ranging from more to less hazardous – e.g., alum and chrome to hunter's "orange bottle" solution
- Also, soak-in versus brush-on solutions
Check out Wikipedia and Steel Horse Leather for more context.
Based on a friend's recommendation, and to keep things simple, I opted for the brush-on "orange bottle" solution available in Cabela's.
Materials:
- 3-5 bottles of "orange bottle" tanning solution for a medium elk
- Thick, dish-washing gloves
- Tarp (again, 6x8' did the trick)
My process:
Tanning (48 hours). I drained the elk hide for ~48 hours. It was still damp and malleable, but dry enough to absorb the solution.
Per "orange bottle" instructions, I soaked the sealed bottles in warm water for ~30 minutes to soften the solution. Then, I drained two bottles on the hide, skin-side up, and worked in the solution using my dish-washing gloves.
Once the solution was evenly spread, I flipped the hide skin-down on a clean tarp. Orange-bottle instructions suggest folding the skin together. I assume the goal is to prevent air drying before the solution can be absorbed. Laying the hide skin-down (on a relatively clean surface) accomplished that, while giving still-damp hair an opportunity to dry. I cranked up the garage heater.
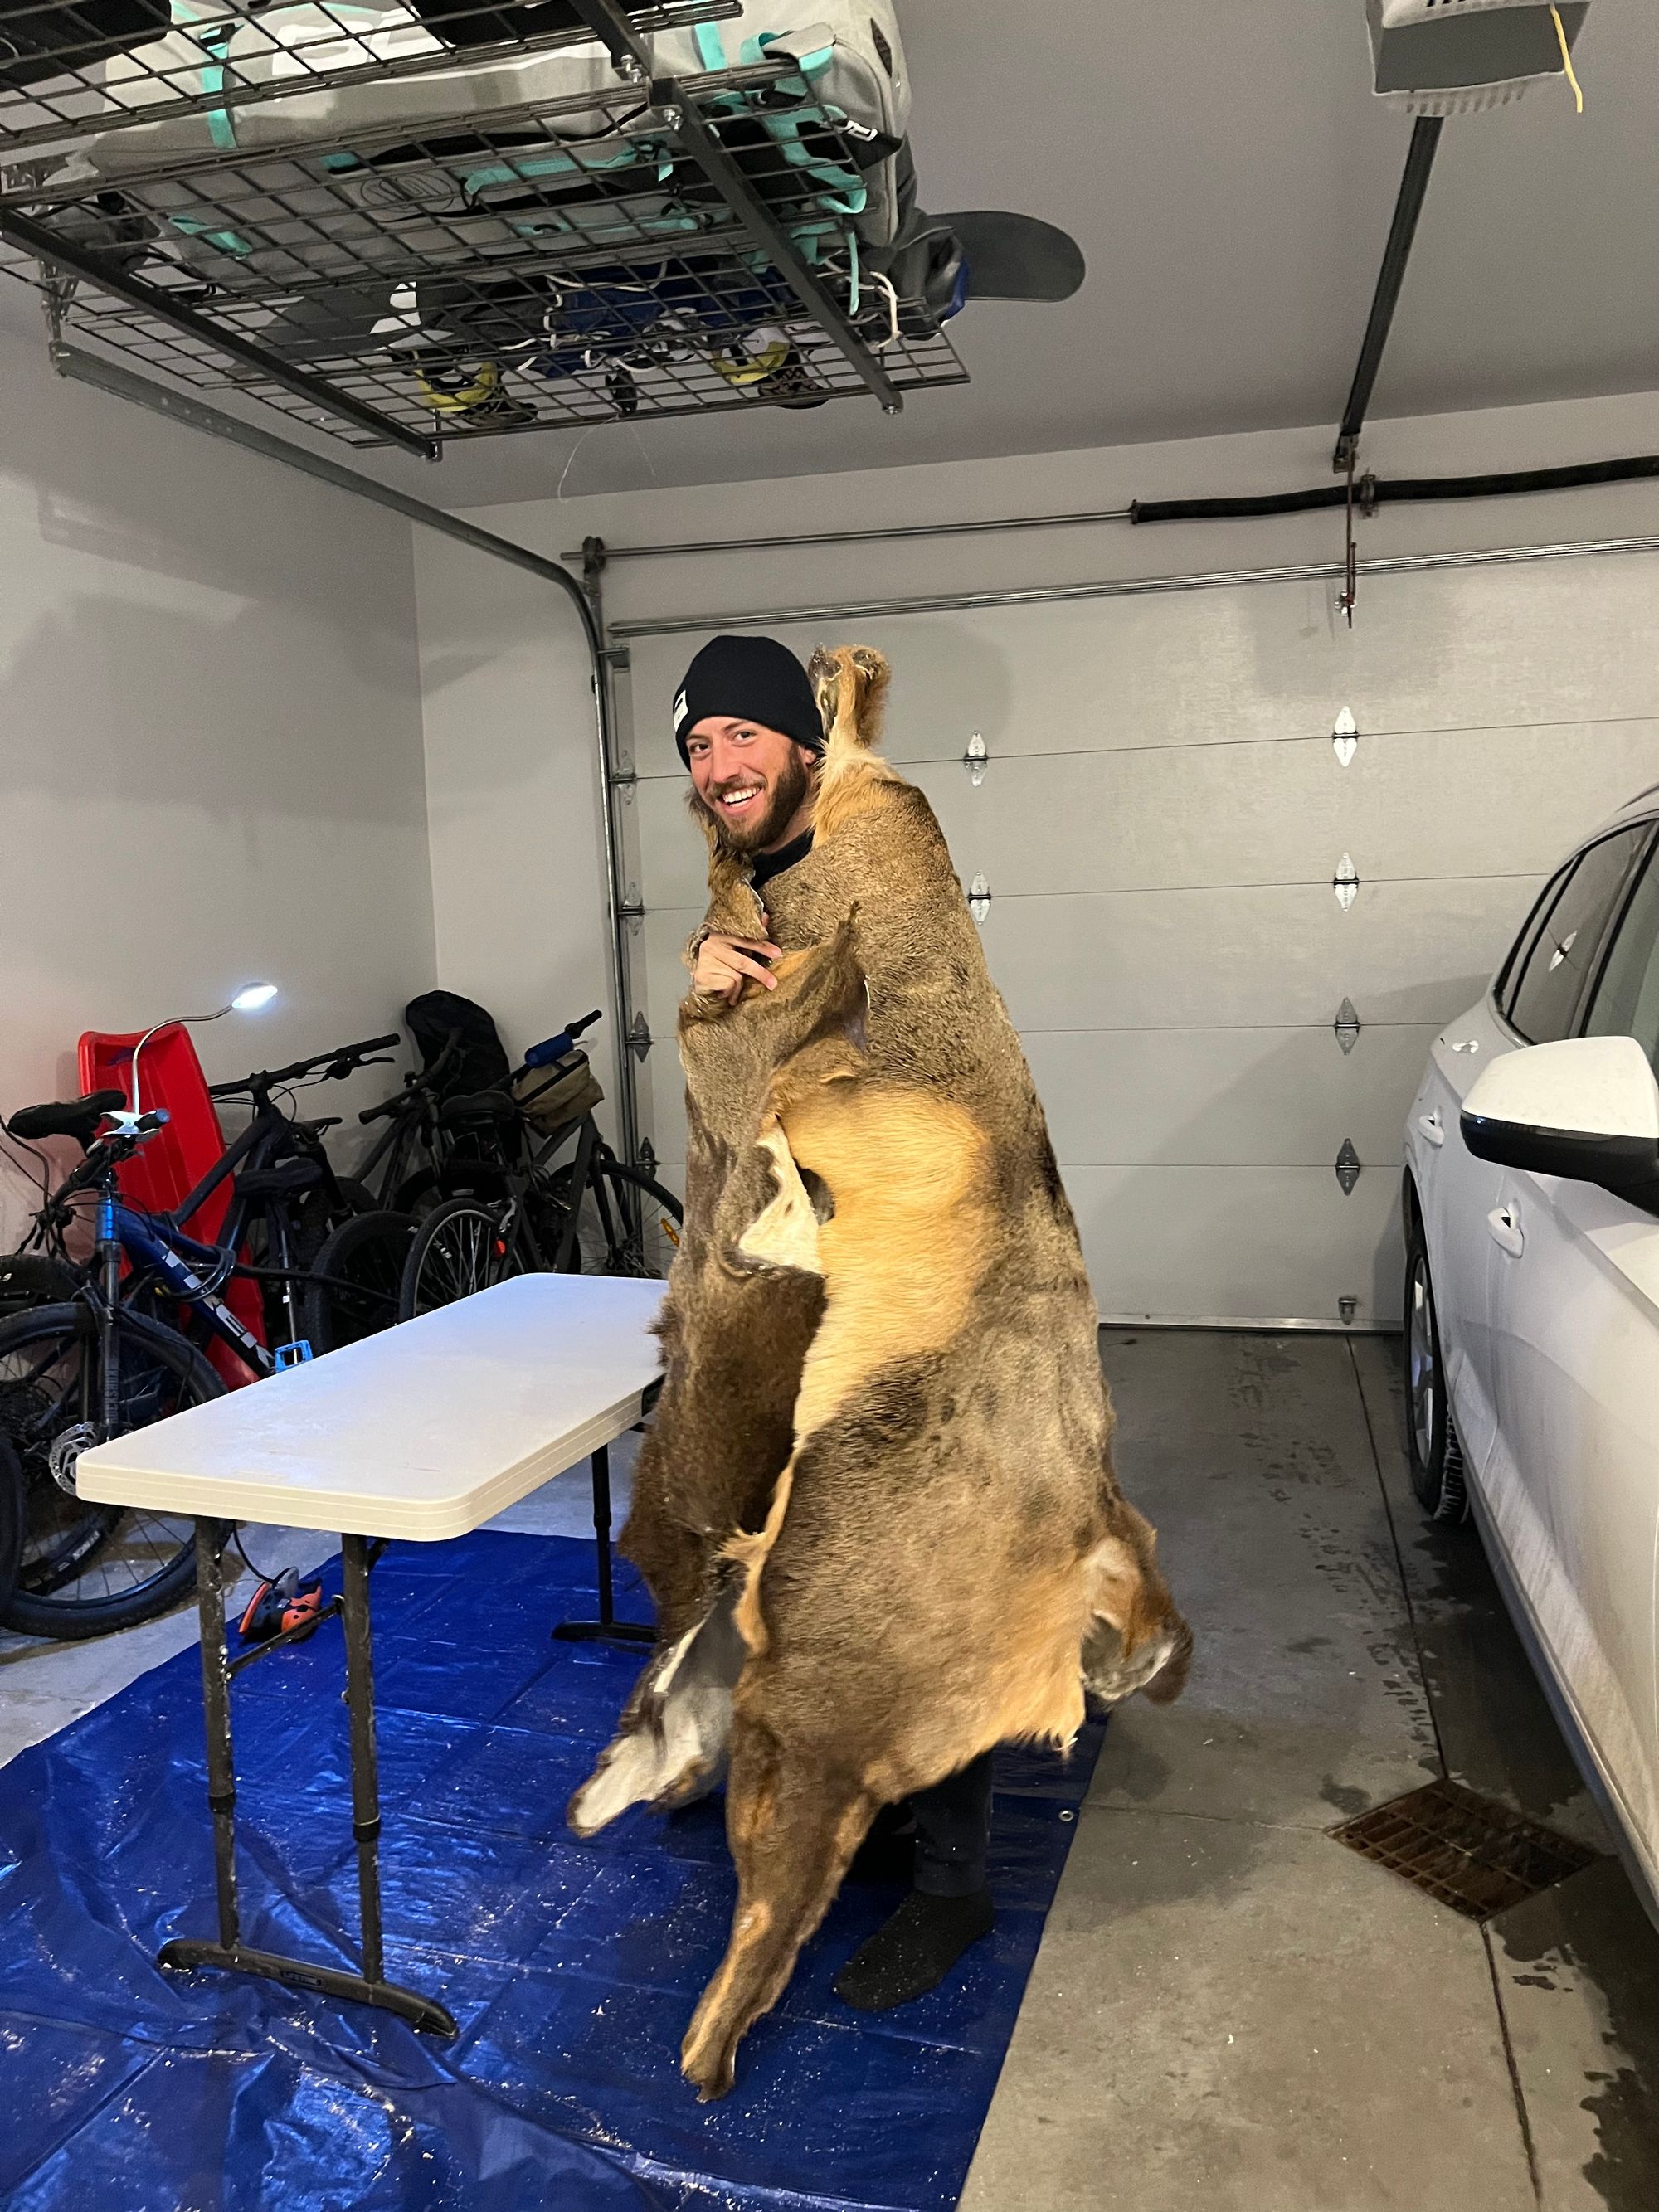
After 24 hours, I flipped the hide and applied another bottle of tanning solution (for three total). I flipped the hide skin-side down, allowing the hair to finish drying. After 12 hours, I flipped the hide skin up.
Note: Don't let the hide completely dry before breaking (see next step).
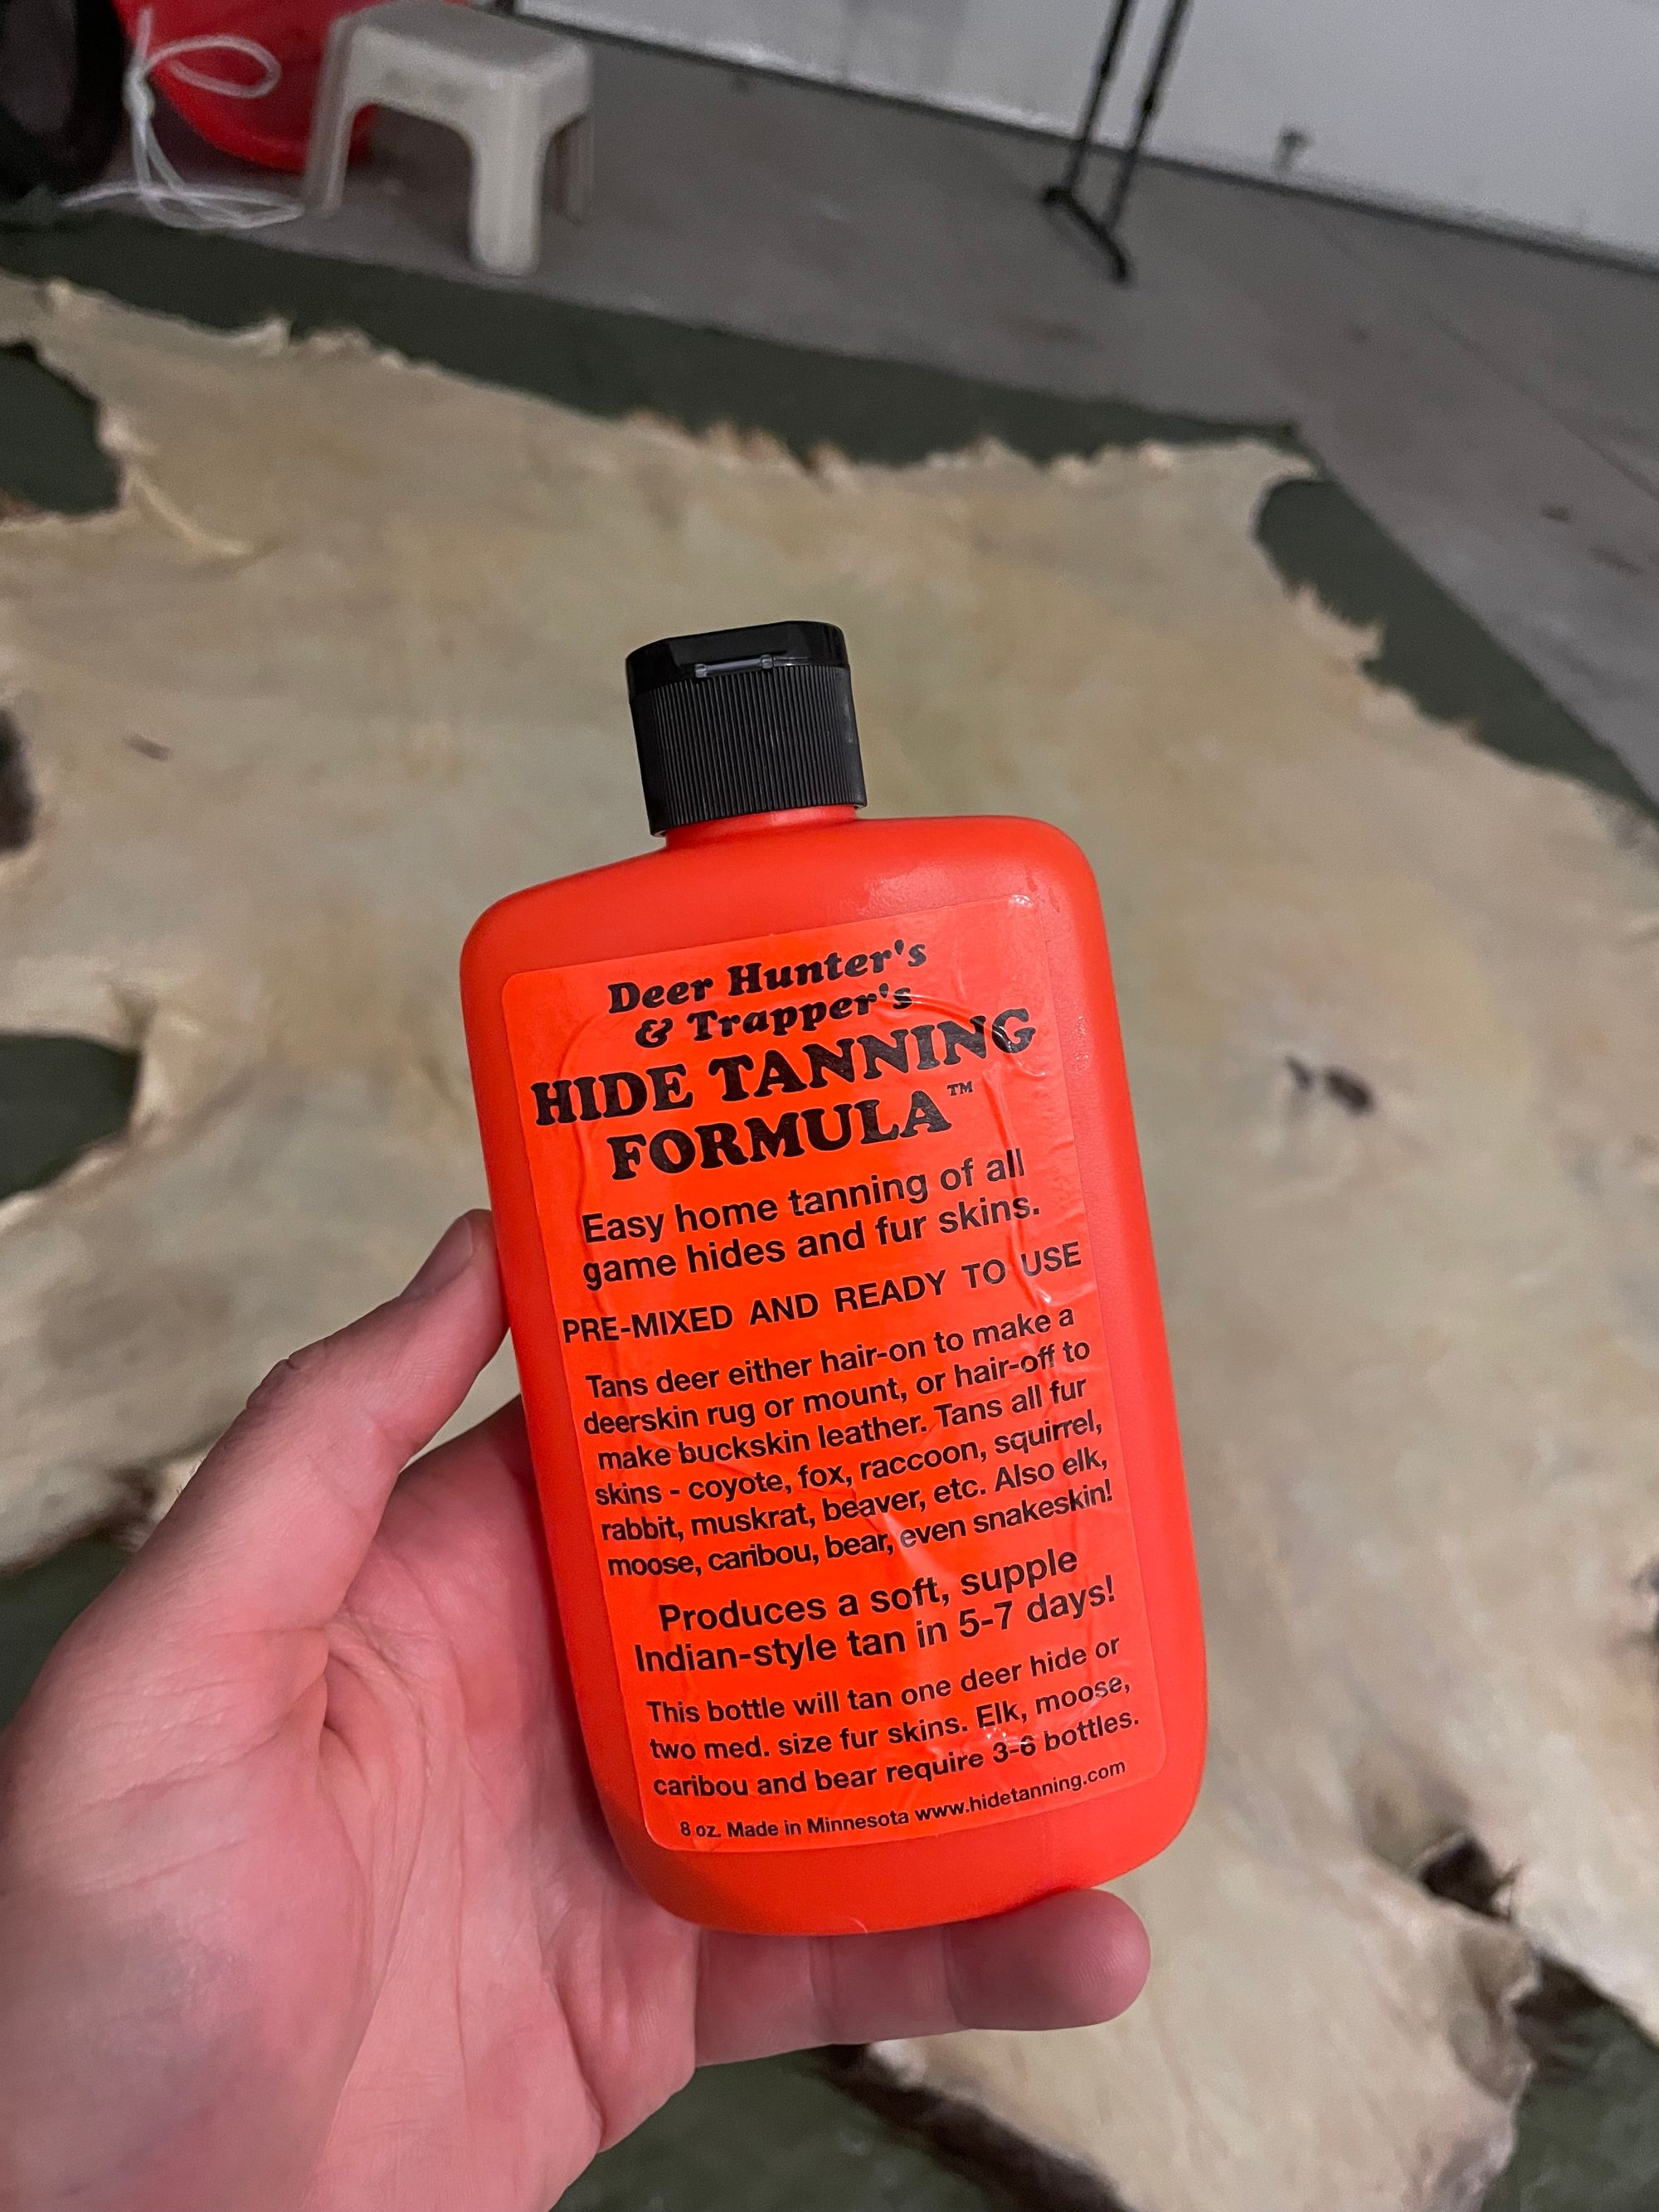
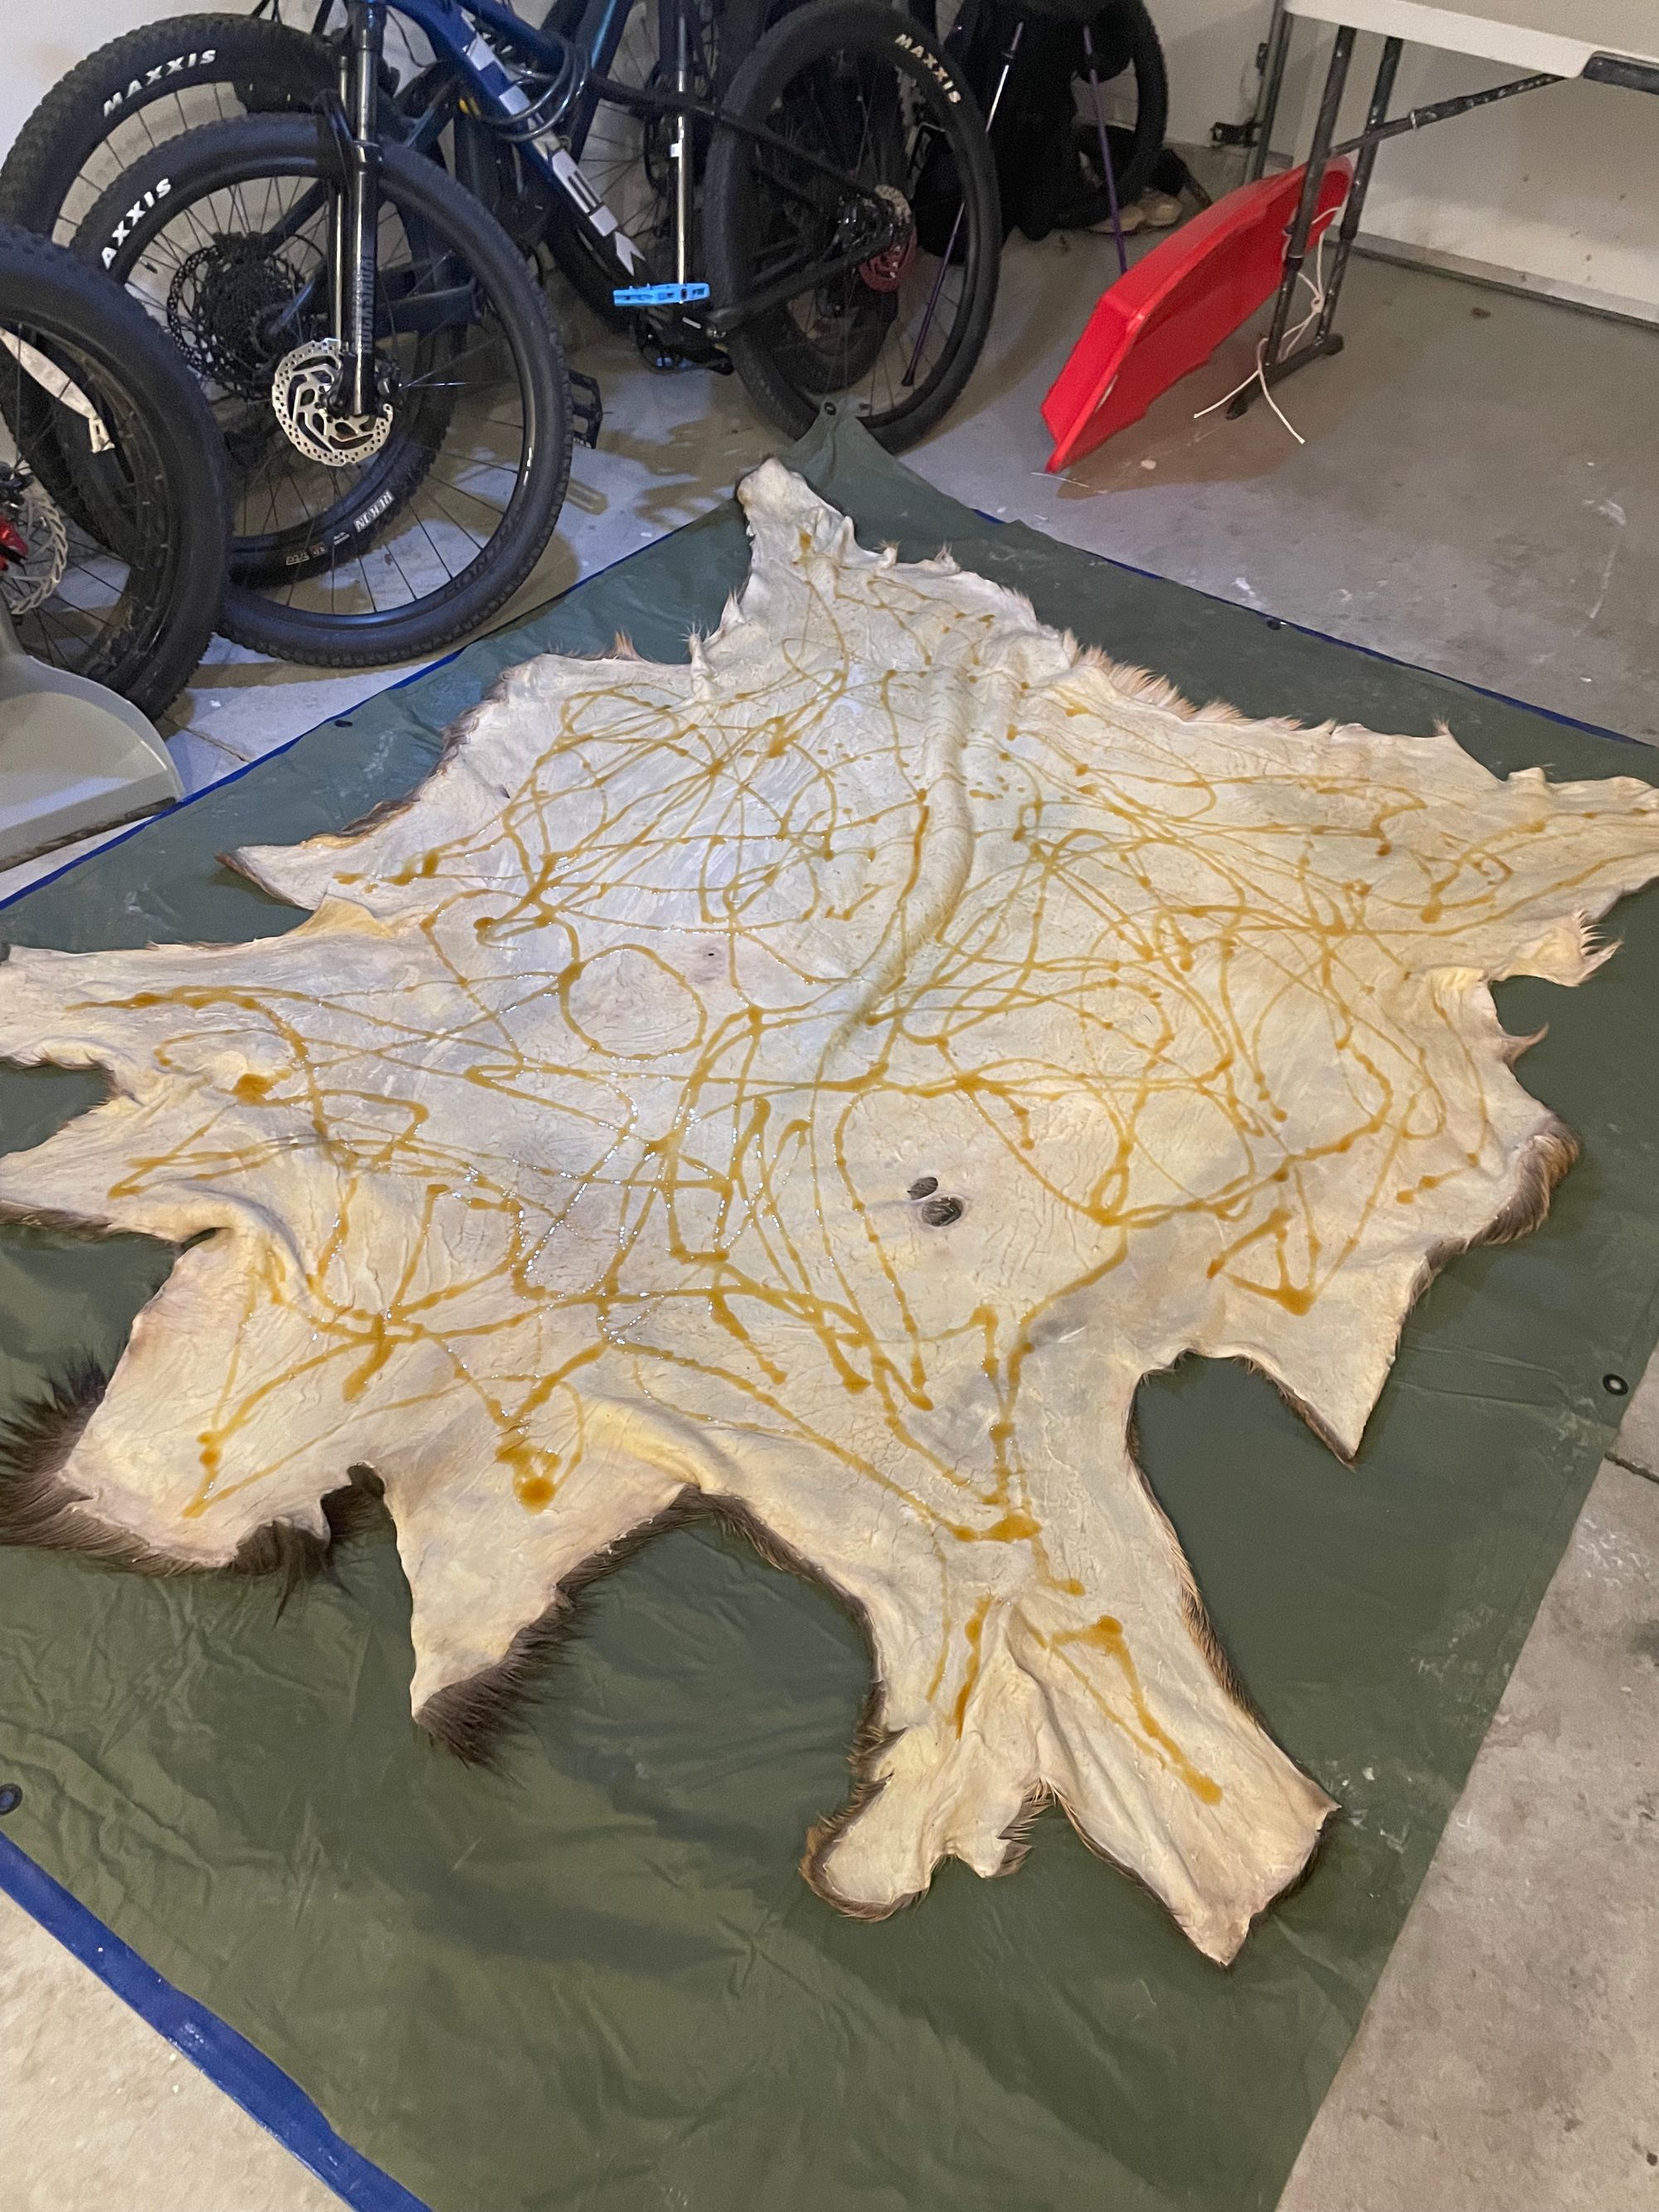
"Orange bottle" (left); tanning solution waiting to be rubbed in (middle); fur-up to allow for absorption (right)
Break, thin, moisturize and fluff
After tanning, the hide should be preserved. Any further steps are dictated by planned use. I envisioned a soft hide that could serve as a throw blanket. I also wanted to protect the leather with waterproofing.
Materials:
- Gloves and a firm, rounded surface for breaking
- Hand sander for thinning
- Neatsfoot, lanolin, almond or mink oil – I used mink, mostly due to availability – for conditioning / waterproofing
My process:
Breaking (at least a few hours). Once the tanning solution had absorbed, but the hide hadn't fully dried, I started stretching (aka breaking). Unless you're aiming for plywood-level stiffness, it's a highly-recommended step.
I tried a few approaches. First, standing on the hide and pulling at the edges until the skin turned white. Second, and more effective, I stretching sections of hide – fur down – over rounded edges of the plastic folding table. The second approach turned more of the skin white, meaning fibers were breaking.
Both approaches strained my forearms. I split up breaking over a few consecutive nights. I folded and rubbed stubborn spots like the hind legs and elbow joints.
In the end, the hide was still stiff in spots, but all the skin was a similar shade of white. The surface had yellowed slightly from the tanning solution.
Taking a break from breaking
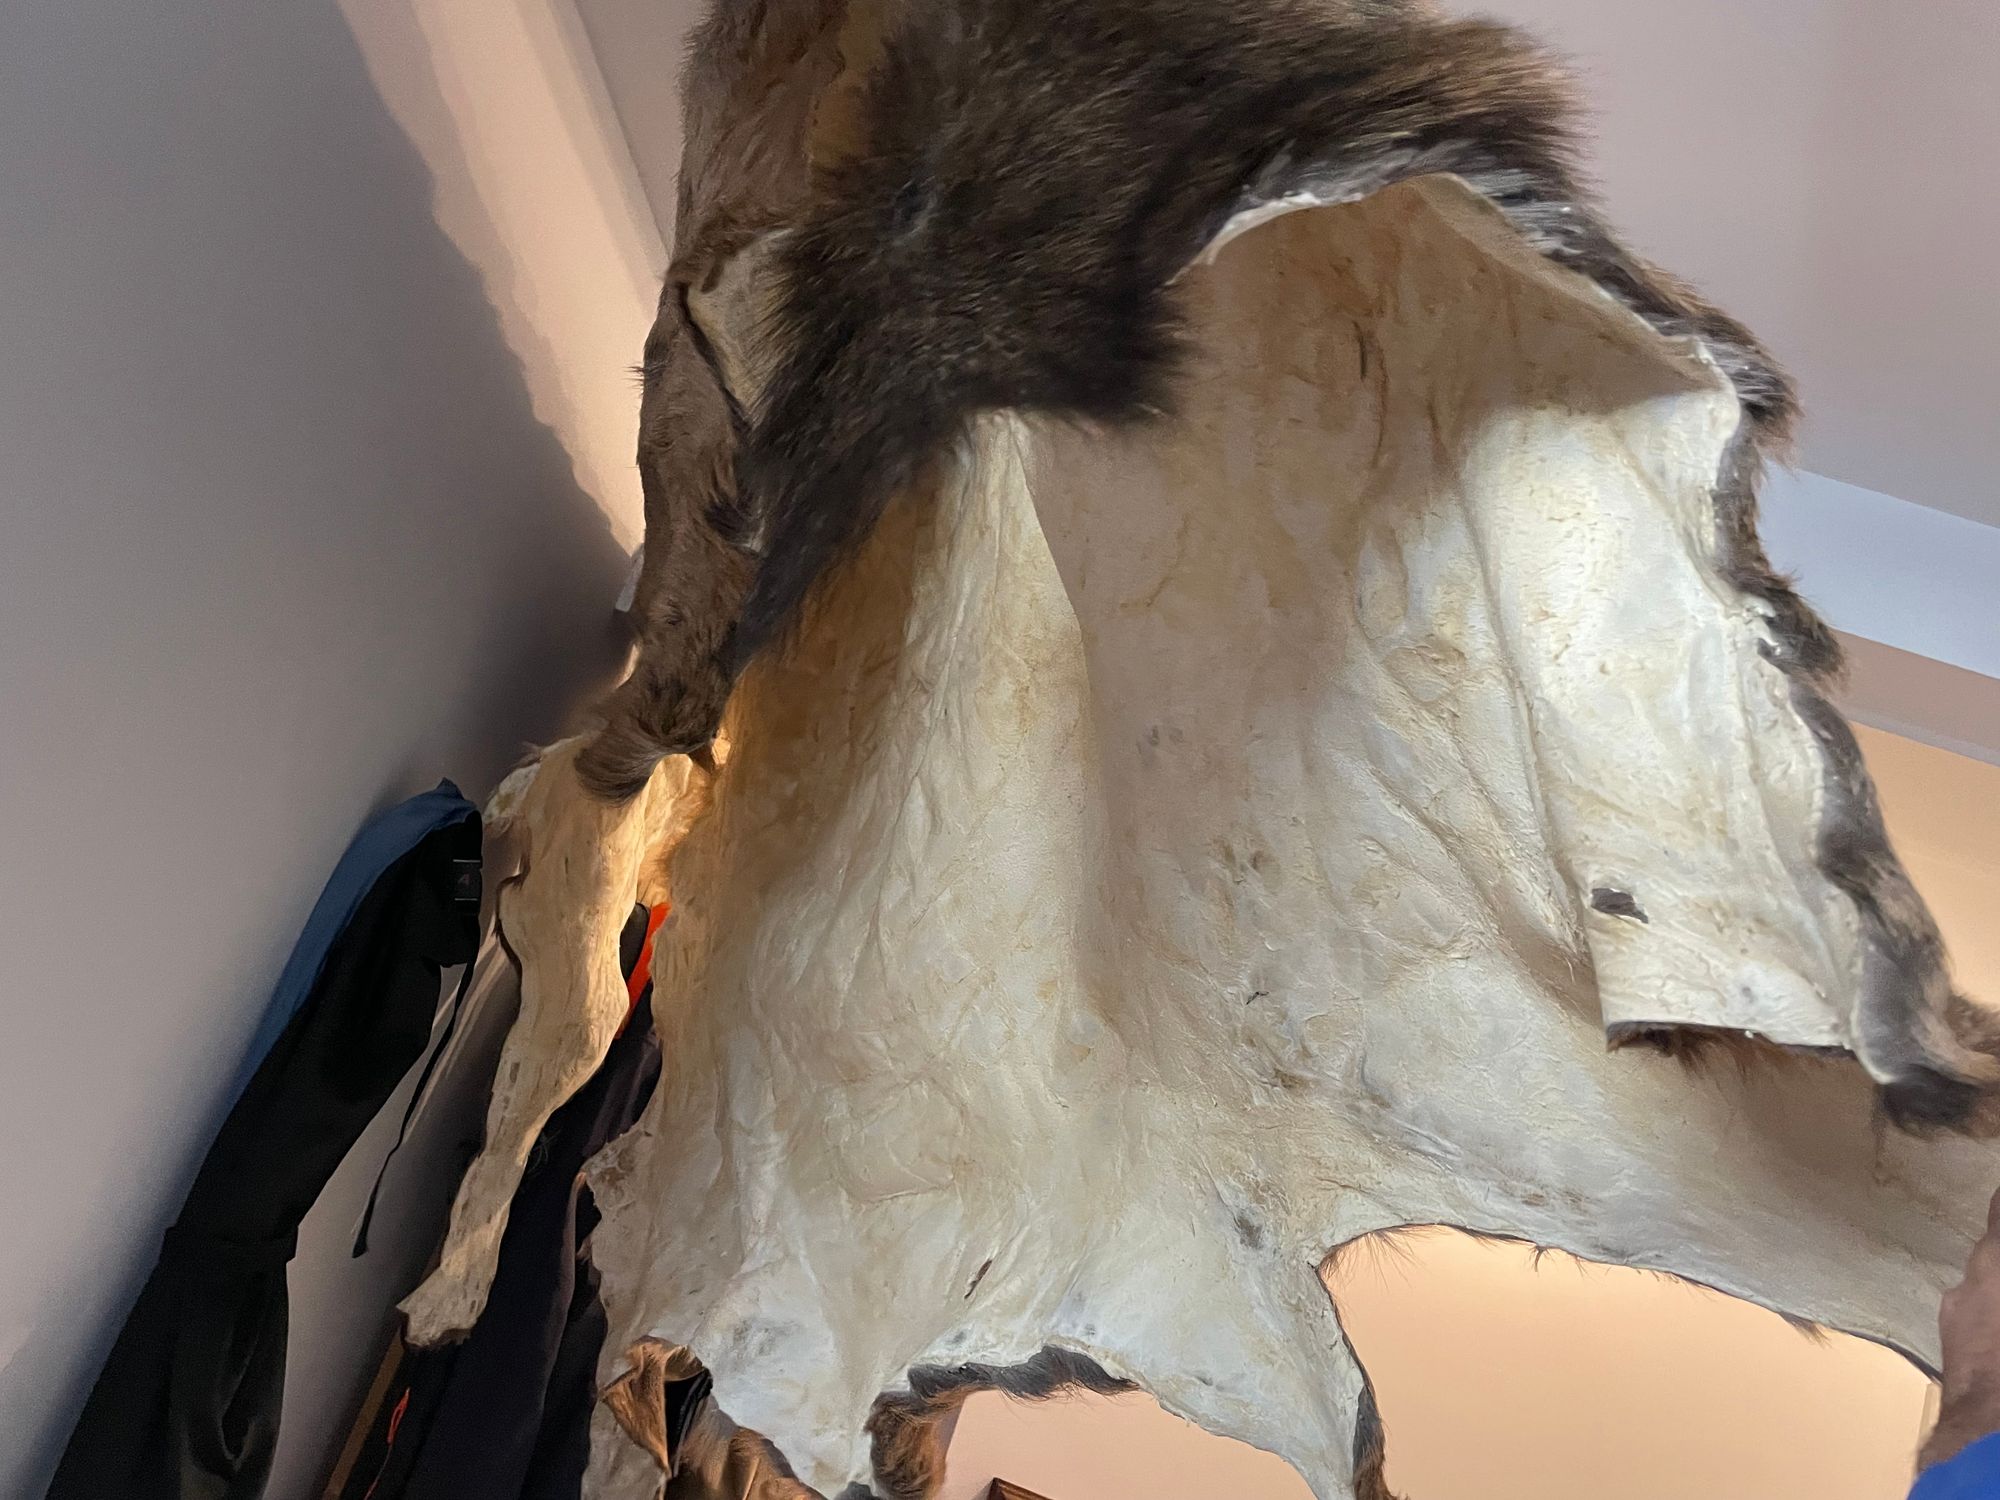
Thin / soften (at least a few hours). Once the hide fully dried, I bought a hand sander from ACE, aiming for a nubuck feel. I worked my way across the hide, section by section. The skin became soft to the touch and whiter as I removed surface stains from excess solution.
In retrospect, I might've needed either (1) more neutralizing for better penetration or (2) less solution. (I feared losing hair by over-neutralizing.)
I sanded a couple consecutive nights. Occasionally, I broke through the hide – but only minor tears, none visible from the fur side. Comfortable with texture and thickness, I returned to breaking stiffer portions of the hide.
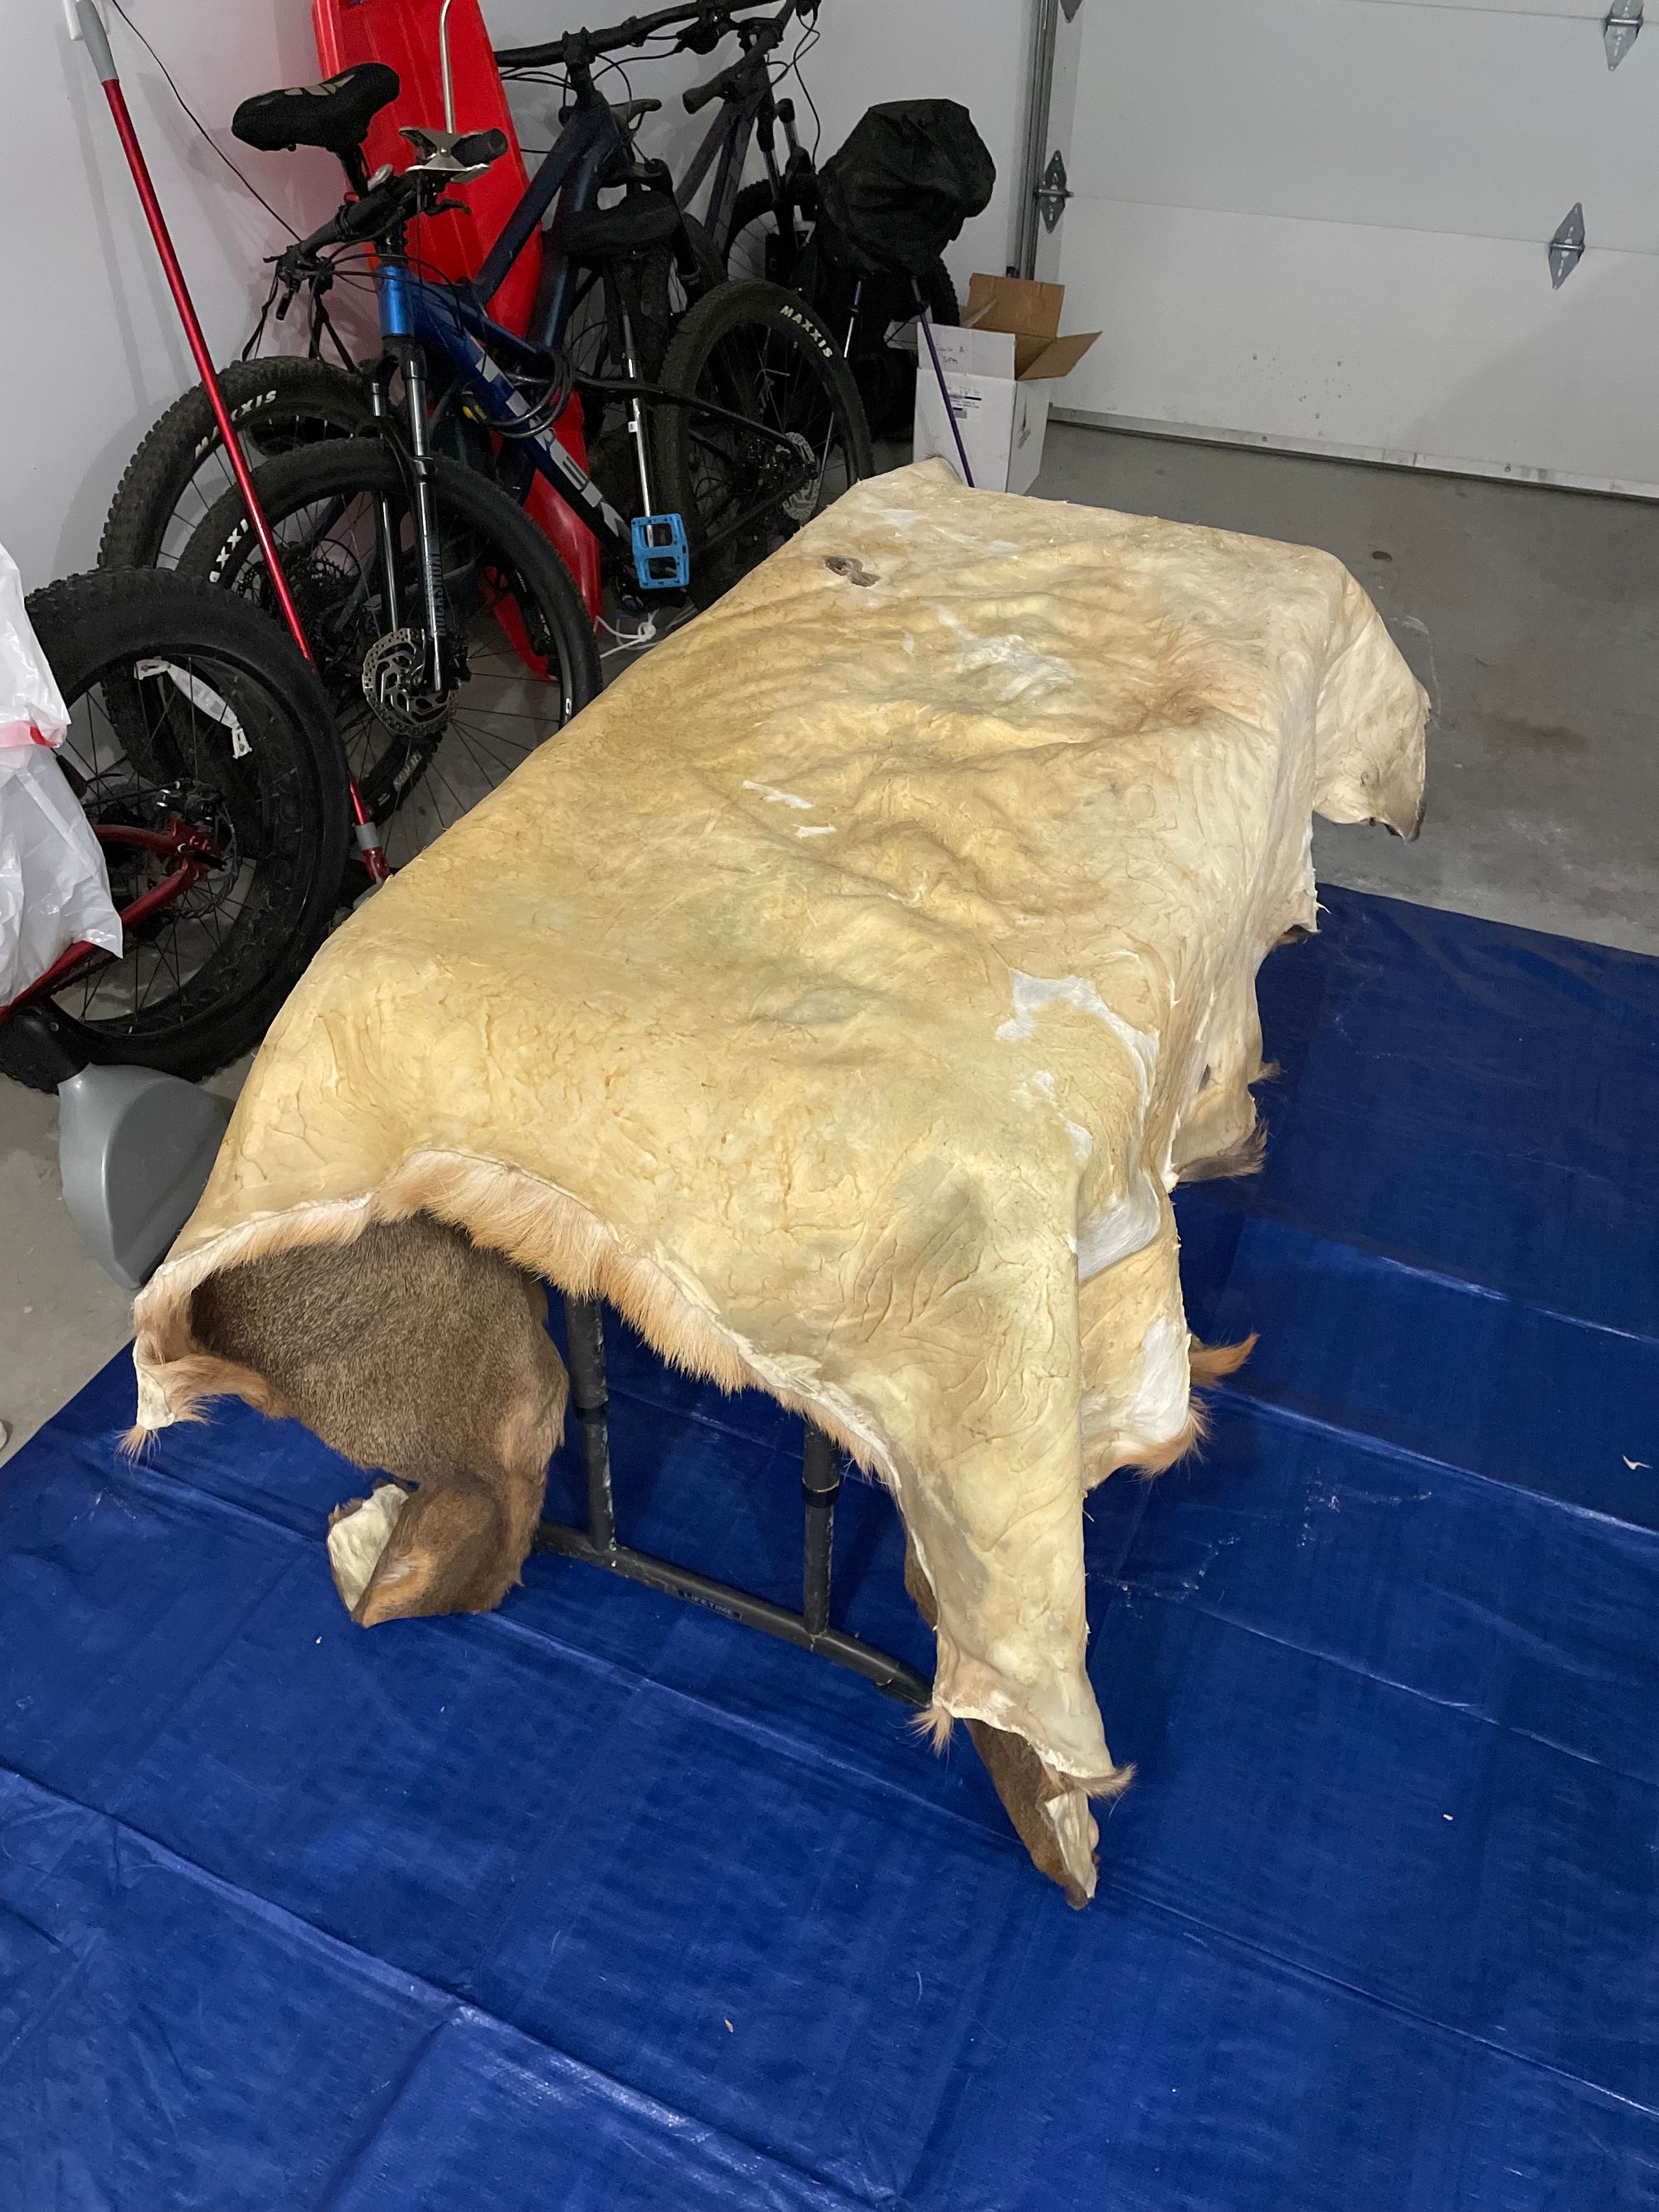

Various stages of the breaking and thinning process; the tanning solution left a yellow tint on the surface that mostly disappeared as I sanded away the top layer
Condition (30 minutes). Based on how-to articles, and from experience caring for leather shoes, I wanted to moisturize the hide. I also thought oil might soften the hide for more breaking.
I read some articles ranking oils for leather care. After checking stock in a local hardware store, opted for Mink oil.
Like the "orange bottle" solution, I soaked the sealed jar in warm water to soften its contents. Using the dish-washing gloves, I scooped oil and rubbed it evenly over the hide. After applying an even coat, I let the hide sit.
After a few hours, I wiped off excess oil and attempted more breaking. The oil changed the texture from nubuck to finished leather.
Fluff (30 minutes). As a final step, I used a vacuum and brush to fluff the hair. During sanding, skin flakes lodged in fur at the hide's edges. A handheld vacuum removed them. I brushed in the direction of the fur, still concerned about dislodging loose strands of hair.
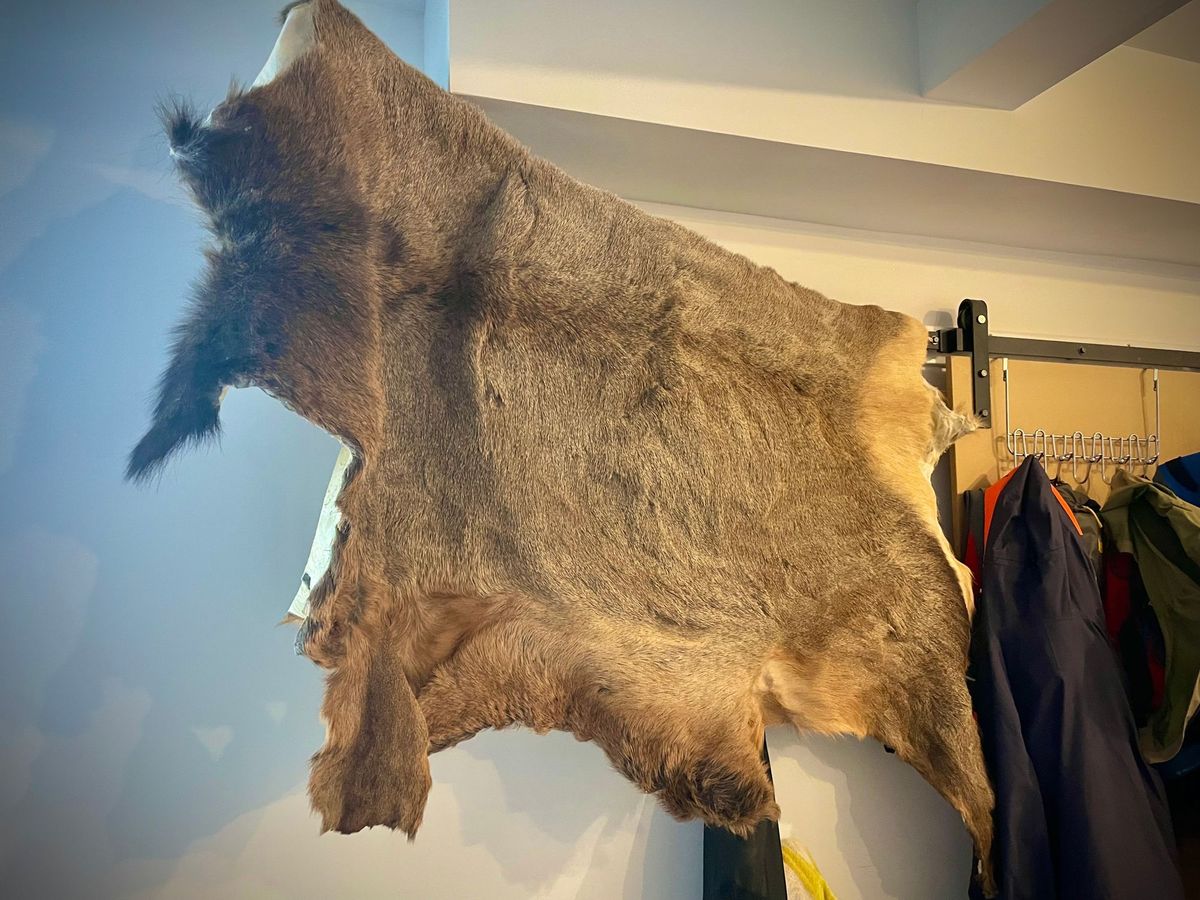
Considering my improvisation, I was thrilled with the result and hung the hide from paracord in our garage. I picked a dry, elevated spot away from heat sources.
I didn't quite have a supple blanket, but the hide was flexible and hair stable. Fur still hasn't fallen out since the hide dried – mission accomplished.
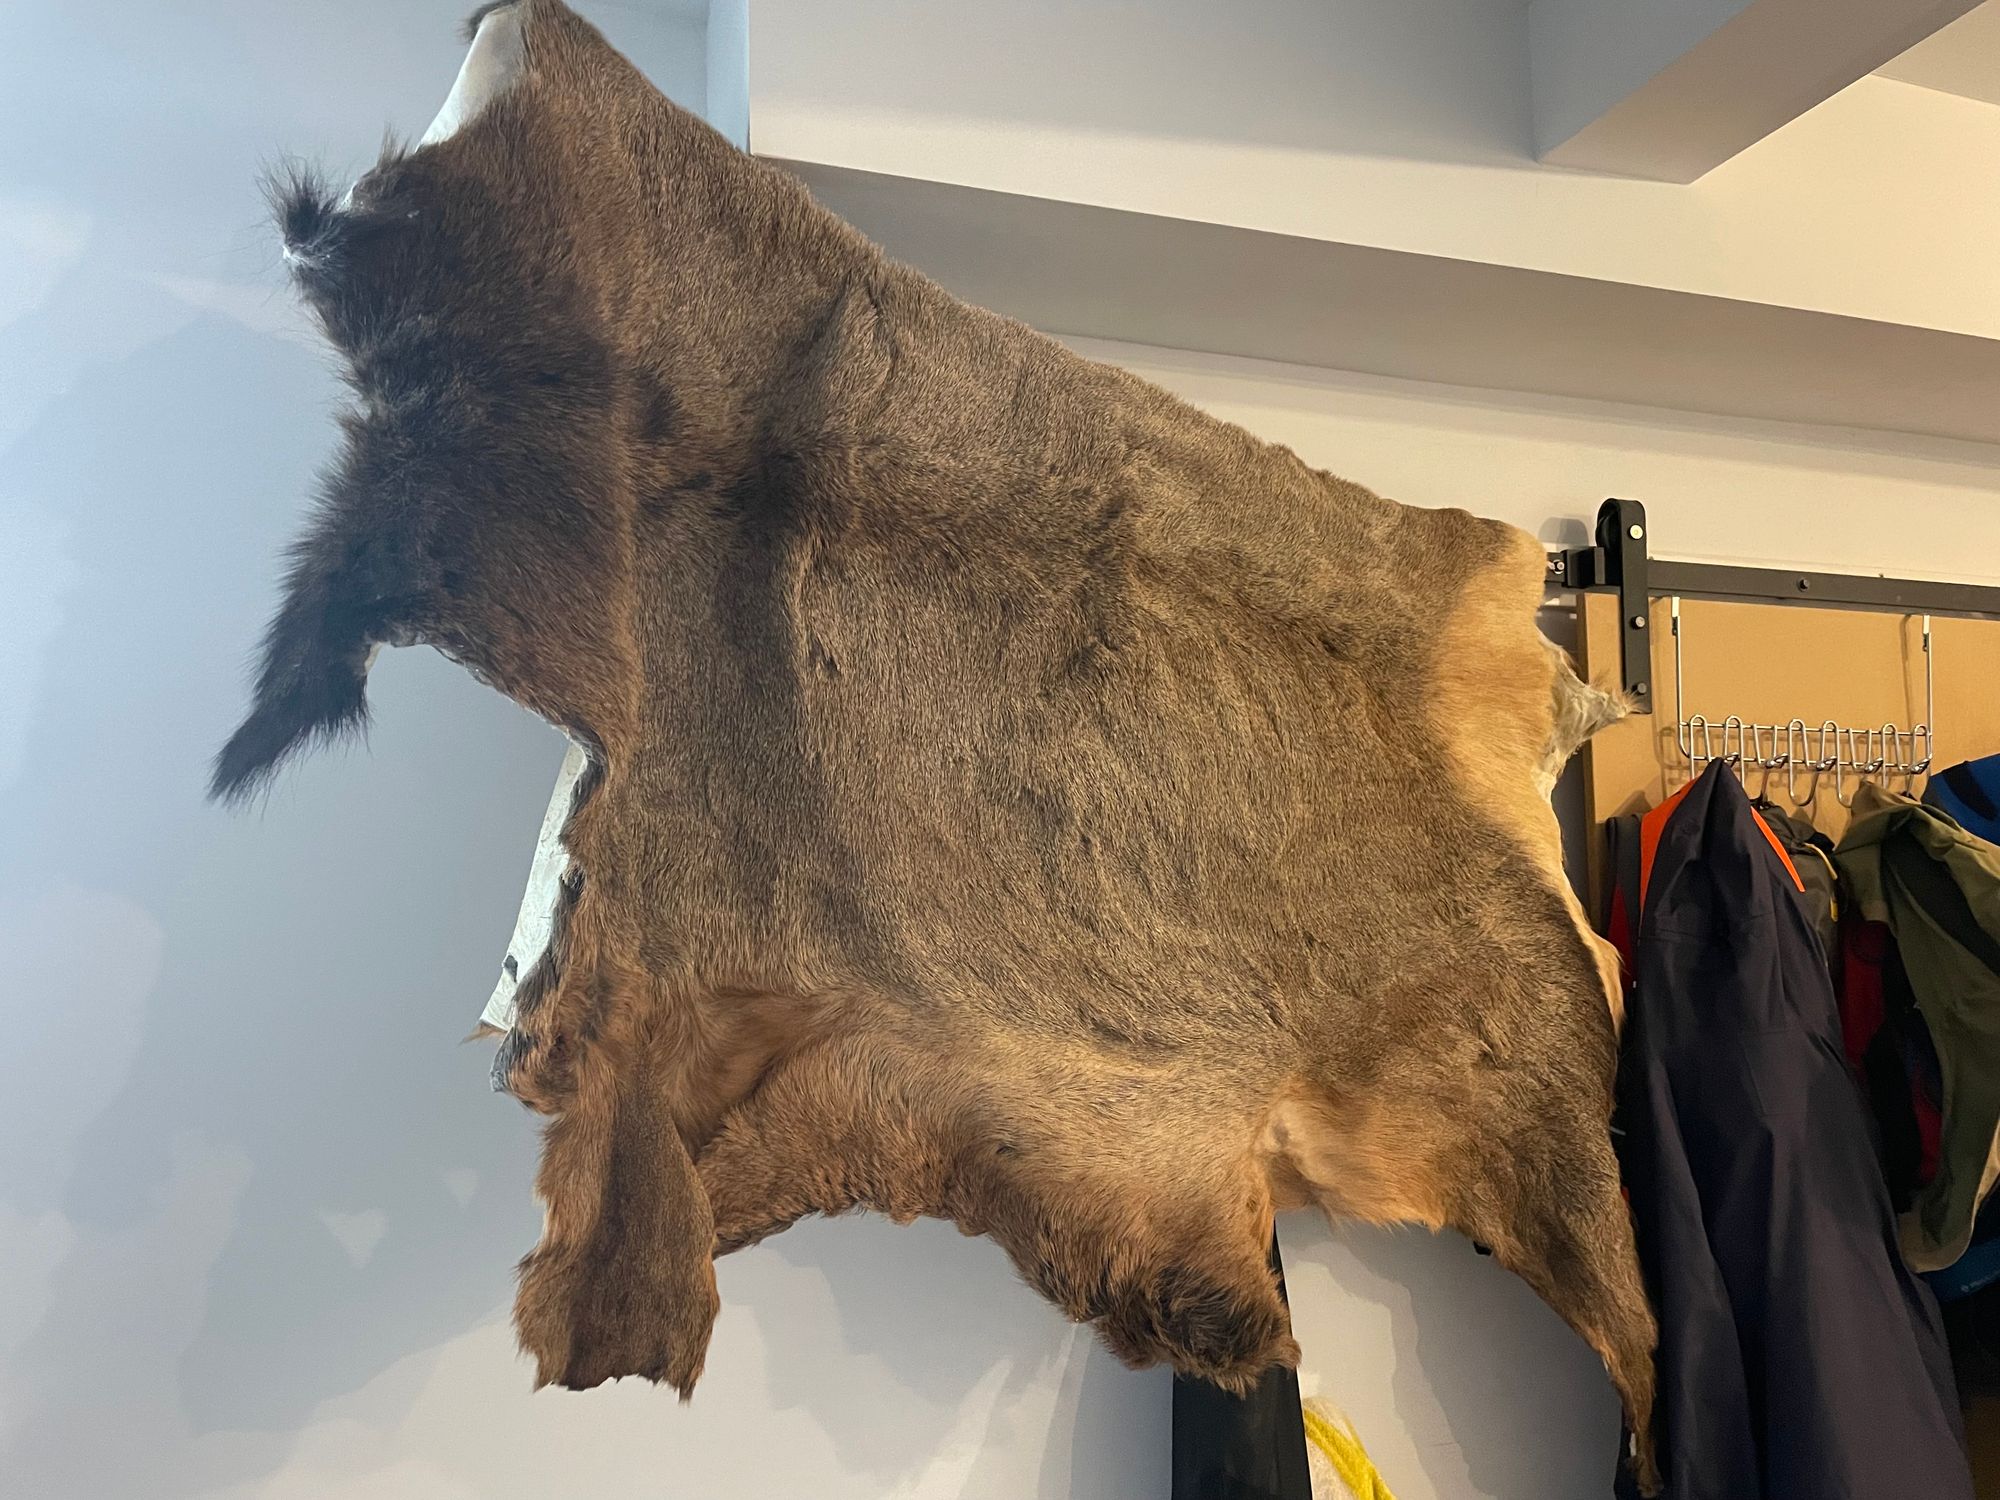
Final result